


Bike Prep
Bike Prep for a long trip – Maintenance and Fixes
#1 - PREVENT issues in the first place!
#2 - Make repairs EASY when they happen.
Bikes break. Get used to it, it's a fact of life. They especially break when you're overloaded, enjoying yourself on a big trip, perhaps riding it hard, and maintenance is needed more often than you're used to. It's not annual anymore, you're putting on a LOT of miles, and often in bad conditions, so you need to be checking it regularly - as in daily or at least weekly.
Listen to the discussion between Grant and Jim that was the start of this on Adventure Rider Radio!
Prevention:
DO the prescribed regular maintenance, PLUS thoroughly check it over on a regular basis.
The manufacturer of your bike has put in a HUGE amount of effort to ensure that the recommended service intervals and things to check will keep your bike in the best condition possible. They will often give a service interval, then a note "if in dusty or hard conditions, service more frequently". That means twice or more often, depending on just how hard. Better to err on the side of too much maintenance than not enough, and have it break in the middle of nowhere because you were to lazy to have a good look at it. Treat it like you love it - and you probably do - but that doesn't mean neglect it and assume "she'll be right because she always has been."
TIP: Keep a flashlight INSTANTLY available, because when it breaks down, it will always be in the dark if you don't have one.
What breaks?
The number one failure / problem point is generally electrical, so I put in a lot of time to PREVENT electrical issues. The number one electrical issue is simply the connectors get dirty and corroded.
I PREVENT that by taking apart ALL electrical connectors on the bike, preferably from NEW, and clean thoroughly if needed, and reassemble with dielectric grease to prevent future issues.
Clean corrosion off with baking soda mix, very fine sandpaper, a scraper, fine brass wire brush, whatever is needed to get it completely clean.
- Steel wool wrapped around a tiny drill bit is good to clean out the female tube type connectors. Run the drill backwards to prevent inadvertently drilling a hole or catching on something! Watch your fingers!
- Diamond Micro files exist specifically for this job too:
- Female Bullet Connector Cleaner Set:
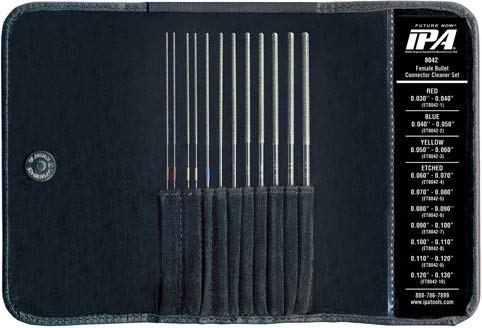
- Available at:
- Micro Male Electrical Pin Cleaners:
- Corrosion X, aerosol anti-corrosion and lubricant:
- TC-11 - aerosol penetrating corrosion inhibitor and lube:
- Amazon.COM
- Vinegar and then baking soda to neutralize the acid works well too. Soak in straight vinegar for 30 minutes and then move into a baking soda mix.
- Spray with an electrical contact cleaner to finish.
After cleaning:
- LPS 1 (Amazon.COM) is terrific if the connector was bad. It's a moisture-displacing dry film, lubricates, great on electrical connections to help prevent corrosion.
- Reassemble with dielectric grease.
- If they're really bad, you can get new identical connectors for everything at a number of places. Install them properly, and finish with the same procedures as above. Don't forget to use heat shrink tubing for protection and extra strength at joints.
- Amazon.COM
- Amazon.CA
- ALIExpress
- Vintage Connections
- and there's lots more places!
- To prevent future issues, in addition to the dielectric grease protecting the connectors, we want to keep water getting in. I like to seal the front facing end of electrical connectors with silicone seal. Despite that, remember that water WILL find a way IN, so leave it a WAY OUT.
- Side stand and clutch safety switches. Some will advocate removing them, but I think theyre a good safety item – we all have lapses – so make sure you look after them and seal them up well to prevent issues, and know HOW to bypass them if they fail!
- Adding goodies / farkles! MAKE SURE you fuse everything appropriately, and don't overdo it. Keep it simple, as every gadget you add is another one to go wrong. Do you NEED it is the most important question. Also a tip on fuses – use the same type as the bike uses, so you're not carrying multiple different kinds of spares. Carry at least three of each spare. One to "just stick in if it blew" and hope it's a transitory issue, two to use when you think it's fixed, and third to use when you're SURE you've fixed it!
- I carry my spare fuses right next to the fuse box. You can also get fuses that light up when they're blown!
- Check with your dealer and online forums what electrical parts regularly fail. Africa Twins (old) voltage regulators fail with a depressing regularity, so it's standard to replace them with a better after market item. Same with old BMW airheads, the rotor and diode boards fail, so there is a big aftermarket in better charging system components for them. Do it before you go, and worry less.
- Spark plug caps and coils. Use dielectric grease on the rubber seal for the cap to seal it, and make it easy to remove and install. Check and make sure everything is clean, no cracks, no sign of perishing, and aren't stiff with age. Check the low-tension connections carefully as discussed earlier.
Think hard about what needs protecting from dirt, water and damage.
- A good example is on our RTW bike, an ‘86 R80G/S, the clutch actuating mechanism is on the back of the transmission, directly exposed to all the dirt and muck thrown off the rear wheel. There is a small rubber seal to protect the shaft going into the engine, but nothing to protect the needle bearing pivot, which when used off-road quickly rusts and seizes, and is then a bear to remove. So I got some inner tubing and cut it up and glued it together with contact cement to make a little boot to cover it over. Zip-tied in place, and filled with grease, the original parts are still there over 150,000 miles later, and working perfectly.
Make it easy to fix
Routing spare cables...
- alongside the original is an oft-recommended tip, but I believe it's a holdover from the BAD old days when cables were thin and weak and broke regularly.
- Instead, keep an eye on the cable at the pivot points. ANY sign of wear means it's going to need replacing soon. Perhaps replace it EARLY, and keep the old one as a spare in cases something happens and the new one gets snagged or breaks prematurely.
- Most importantly, prolong the life of the cable by cleaning and greasing the pivot point at the lever. The number one reason cables fail is because the pivot is grotty, so that when you pull in the lever, the cable is forced to bend – and we all know what happens when you bend metal back and forth – it breaks!
- IF you do decide to route the spare cable alongside the old, better to put the NEW one in and then you KNOW it is actually correct and fits, and your (old) SPARE is correct!
Wheel bearings
- Many people have recommended carrying spares, but they're heavy, and can be bought virtually anywhere if needed. A Bearing Supply House only needs to see your bearings to be able to supply an equivalent replacement for 98% of the wheel bearings in use. (I suspect ALL, but just in case some manufacturer has done something very special for some weird reason… 98%) Also note most engine and other bearings are standard too.
- Maintain them – make sure they're clean and well-greased with good waterproof / marine grease. EVERY time you take the wheel off, CHECK them and re-grease if needed. Check the seals, make sure they're in good condition and not letting dirt in, and replace if needed. Note that the inside lip is supposed to be SHARP, not flat and dull. Pack the back of the seals with lots of grease. Grease the axle so water doesn't get in along the shaft.
Prevent crash damage
- Have a GOOD look at the bike and decide what needs protecting. Lay it on its side! And don't forget to flip it over. Good practice – can you pick it up?
- Barkbusters or the equivalents are a great start to protecting the levers.
- Make sure the handlebars are strong – some bikes have very poor quality bars that bend too easily! Think about the ergonomics and shape of the bars too.
- What about the master cylinder? Does it need protecting?
- Install good strong crash bars.
- Think about mirrors – installing a "flip" or folding mirror now means your old mirrors can be sold and generate some cash for travelling. The stock mirrors cost MORE than replacement!
- Skid pan / Sump guard – you NEED one! Get one as long as you can to fully protect the bottom of the bike when sliding over a log or rock. If yours is attached with rubber bungs (e.g. R1200GS) carry a couple of spares – a good hit and they'll rip off, which they're supposed to instead of cracking your sump, BUT finding replacements can be difficult.
- Headlight – it's vulnerable to rocks flying up from passing vehicles and it's expensive. Protect it.
- Radiator – protect it! Flying rocks, crashes etc.
- Gear and brake levers – can easily bend and punch a hole in the engine cover of many bikes. You can buy engine covers that fit tightly to the case to beef this vulnerable area up.
- Protect the rear shock with a "hugger" of some sort to keep muck off the shock and greatly prolong its life. Add a mud flap to the front fender to keep muck off the engine and help cooling in muddy slow going.
Fuel filter
- Make sure you have a fuel filter in place. Fuel injected bikes often have one in the tank, which is often expensive and awkward to replace. If it's old, replace it now. You may want to carry a spare. Having already done it at home before you left means you know how to do it on the road!
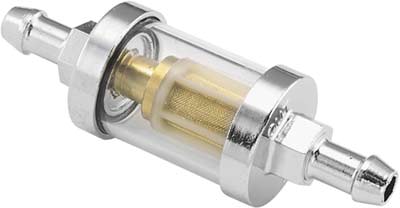
- Carbureted bikes often have only a coarse filter inside the tank, which everyone forgets to clean. Check it, and also add a second external clear filter. With that you can see if there is any issue with the fuel.
- A decent aftermarket fuel filter, clear so you can see what's happening:
Water crossing issues.
Where CAN the water get into the air inlet / airbox, carburetor vents if you have carbs, engine oil breather, transmission / drive shaft breathers etc?
- Think about what depth of water you can SAFELY navigate.
- Then don't go any deeper! :)
- Maybe it's better to push it across with the inlets and exhaust sealed up?
- Or, think about snorkels, rerouting breather hoses etc.
If the bike falls over in the water, shut if off! You really don't want it to inhale water.
- If the engine stops while crossing, it has probably inhaled some water somewhere.
- Once out of the water, DO NOT attempt to start it! If there is water in the combustion chamber there is a VERY high risk of major damage to the engine.
- Remove the sparkplugs and spin the engine over with the starter. If water gushes out, you just saved yourself a major engine rebuild.
- Ideally turn the bike upside down to drain the water! Lift the front wheel high to pour water out the exhaust. Check the airbox, it should have a drain hole, but they often get plugged, or the rubber hardens with age and exposure to fuel vapour and no longer works. (Note to your self – check it when you change or clean the air filter.) Check in any engine covers that have a vent hole.
- BEFORE trying to start it, check the oils! If they're white or milky at all, there is water in there and you want to change it ASAP. Let it sit for a while, and much of the water will settle out to the bottom at the drain. You can loosen the drain plug carefully, don't just yank it out, and dribble the water out until oil runs, then put the plug back in. Since you've let it settle for an hour or so, it won't be too hot.
Suspension
PREVENT issues with maintenance and proper setup, and adequate springs for your load.
More on: Why a new rear shock
- Change the oil in the forks annually with quality fork oil. Service your shocks as per recommended intervals, usually around 20-30,000 miles (30-40,000 km).
- Suspension set up basic how-to
- TIP: Before you do a rebuild, check the spring preload and sag is to spec, as the spring DOES sag/weaken with age. You don't want to check it after a rebuild and it's back on the bike, only to find it needs to come off again for a new spring!
- Most original equipment shocks can't be serviced, only replaced. (A FEW OEM shocks can be rebuilt by specialty shops, so check around.) Remembering that high quality expensive aftermarket shocks are supposed to be rebuilt at around 20-30,000 miles, what does that tell you about your OEM shocks? They're probably overdue! Best is to replace them with a quality aftermarket shock before you go, especially if you're two-up.
- Make sure the shocks are properly set up for the load you're carrying. Virtually every traveller is on the outer weight limit of the stock setup, and if you're carrying a passenger, almost certainly over the stock setup recommendations. Overloaded and worn out shocks fail with depressing regularity, and most travellers will have stories to tell you about what happened when their shock failed. Sometimes more than once...
- Be sure that the front forks are also properly setup. Usually a good set of aftermarket springs will do the job, and regular oil changes with good fork oil.
Final drive systems
- Chains – maintain them well and they'll last a very long time. Abuse/neglect them and they won't.
- There are three basic schools of thought:
- Keep the chain clean, spray a little WD-40 (not my favourite) or light oil / spray lube / chain lube on to lubricate the side plates, and that's it. More effort isn't worth the effort for the increase in life.
- Keep the chain clean, and lubricate religiously with good quality chain oil. TIP: ALWAYS lube the chain when HOT immediately after a ride – the lube will penetrate better, and when you get on it in the morning, the thin carrier will have dried, leaving a nice sticky lube behind that won't fling off instantly.
- Keep the chain clean, and run a Scottoiler or similar to continuously lube the chain.
- And of course a fourth item – if riding in sand or mud, DON'T lube the chain as the lube and sand make a great grinding paste! For sand, keep it clean and dry. For mud, I like to clean it thoroughly at the end of the day and lube it well, and then wipe off any and all excess so it's lubed, but not covered in goo.
Tires
- Make sure the tires are suitable for the job! All modern Adventure bikes have tires easily suitable for the job, but older bikes and smaller dual sport bikes don't. They are designed for light duty, solo, unloaded usage, and as soon as you load on a pile of luggage and a passenger, you're probably way over their limits. Read and understand the Max weight and Max Pressure settings marked on the tire.
- Carry spare tubes even if you are running tubeless tires. They'll get you home if you can't seat the bead or have badly damaged the tire. One for each size.
- Carry lots of patches/plugs as appropriate, and multiple tubes of glue. PRACTICE and KNOW HOW TO USE THEM.
- See my Video on Tires and everything you could ever want to know on changing, patching plugging and more.
Tools to make repairs easy!
This could be a very long list, but it's up to you to carry what works for YOUR bike. When working on your bike at home, use the toolkit from your bike. Make sure you have everything you need to do everything. You will almost certainly want to add some tools. There are a number of great too lkits out there from companies like Motion Pro and Cruz Tools that make excellent starter kits.
I will add:
- Tire pump, hand or electric
- Tools for the Road - Mini Compressor - make your own.
- Tire gauge - a simple pencil type is fine.
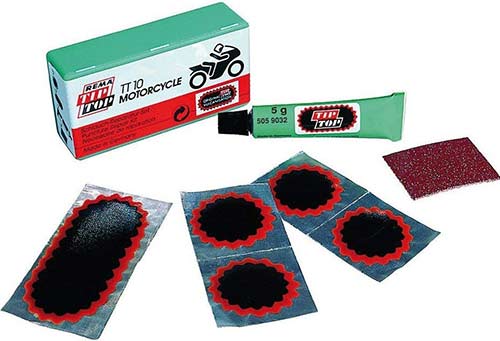
- Plug and patch kits(s) and glue (I recommend REMA Tip Top brand)
Available at:
Rema Touring Patch Kit, #22 Large
Amazon.COM
Rema Tip Top TT10 Motorcycle repairing
Amazon.CO.UK
Rema Tip Top TT-02 Standard Patch Kit
Amazon.CA
- 3 Tire levers to make life easy, or if you're seriously trying to cut weight, two and a Bead Buddy (see below) will do the job.
- If you're running tubeless tires make sure you have the BeadPro bead breaker levers by Motion Pro: (Highly recommended!)
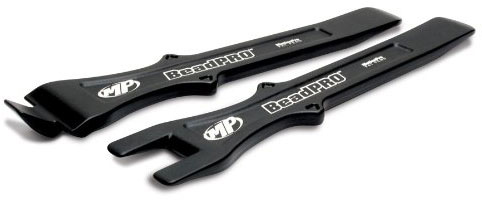

- I like these:
![]()
in an 8" / 200 mm version. Note the "hook" on the right end, this makes it less likely you'll pinch a tube with it. However, they can be difficult to find.
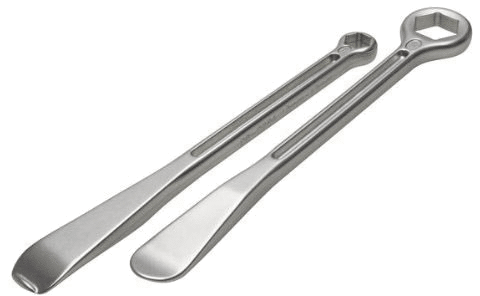
- Nice ones are the Motion Pro 08-0541 27mm and 12/13mm T-6 Combination Tire Lever/Wrench Set (other sizes / combinations are available). A lever and an axle or lock nut on the other end, in super light aluminum alloy!
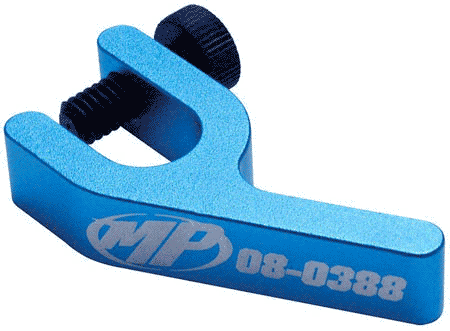
- Trail Bead Buddy for most bikes, makes like a third hand when installing tires, preventing the tire from slipping back up off the rim when levering it on:
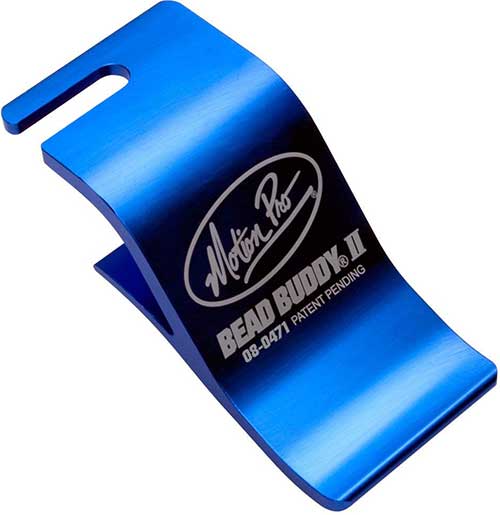
- Motion Pro 08-0471 Bead Buddy II for big bikes with thick rim edges:
Other items:
- A 15cm / 6" piece of fine tooth hacksaw blade
- Small triangular file
- Side cutting pliers and small needle nose pliers
- The feeler gauges you NEED for valve adjustments. Leave the rest at home.
- 15cm, / 6" vise grips
- 3m / 10' foot length of 16 gauge wire
- A 15cm / 6" square of fine and medium sandpaper.
- A VOM (volt / ohm meter) for diagnosing electrical issues. Know how to use it! You CAN fake it with a taillight bulb and a length of wire but it's awkward and not easy. A SMALL VOM is about the size of a small cell phone or less.
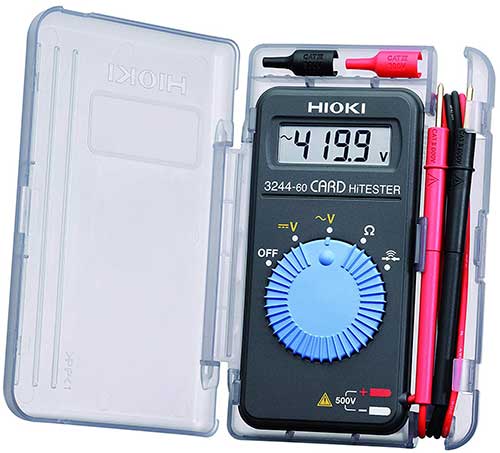
Hioki (pictured above) from:
Amazon.COM
Amazon.CAVictor from:
Amazon.COM
Amazon.CAUarter from:
Amazon.COM
Amazon.CA
- Screwdrivers – a multi-tipped one looks like a great idea – BUT make sure it has LONG tips, as often you need to get "way in there" and a short tip on a fat screwdriver just won't reach. TEST IT! And don't take the bits you really don't need.
- And of course be sure to take the appropriate sockets and wrenches for your bike to do all the routine maintenance. Make sure you have the right stuff by USING your kit for your regular maintenance at home.
Any and all comments appreciated!

And be sure to check out ARR RAW! Grant and Friends discuss anything Adventure Travel!
Ask YOUR question and we'll answer it.

Global Rescue is the premier provider of medical, security and evacuation services worldwide and is the only company that will come to you, wherever you are, and evacuate you to your home hospital of choice.
Additionally, Global Rescue places no restrictions on country of citizenship - all nationalities are eligible to sign-up! Travel medical insurance is also available, currently the limit is 90 days. (TIP: For Evac insurance - Click Multiple Trips and 365 days to get year long insurance.)
![]()
Ripcord Rescue Travel Insurance™ combines into a single integrated program the best evacuation and rescue with the premier travel insurance coverages designed for adventurers.
Led by special operations veterans, Stanford Medicine affiliated physicians, paramedics and other travel experts, Ripcord is perfect for adventure seekers, climbers, skiers, sports enthusiasts, hunters, international travelers, humanitarian efforts, expeditions and more.
Ripcord travel protection is now available for ALL nationalities, and travel is covered on motorcycles of all sizes! NOTE: Travel medical insurance currently has a limit of 90 days.
Member login
Announcements
Thinking about traveling? Not sure about the whole thing? Watch the HU Achievable Dream Video Trailers and then get ALL the information you need to get inspired and learn how to travel anywhere in the world!
Have YOU ever wondered who has ridden around the world? We did too - and now here's the list of Circumnavigators!
Check it out now, and add your information if we didn't find you.
Are you an Overland Adventure Traveller?
Does the smell of spices wafting through the air make you think of Zanzibar, a cacophony of honking horns is Cairo, or a swirl of brilliantly patterned clothing Guatemala? Then this is the site for you!
Hosted by Grant and Susan Johnson, RTW 1987-1998
Next HU Events
HU Event and other updates on the HUBB Forum "Traveller's Advisories" thread.
ALL Dates subject to change.
2024:
- California: April 18-21
- Virginia: April 25-28
- Germany Summer: May 9-12
- Québec: May 17-19
- Bulgaria Mini: July 5-7
- CanWest: July 11-14
- Switzerland: August 15-18
- Romania: August 30-Sept 1
- Ecuador: August 24-25
- Austria: September 12-15
- France: September 20-22
- Queensland is back! Date TBC
- Germany Autumn: Oct 31-Nov.3
- South Africa: November
Add yourself to the Updates List for each event!
Questions about an event? Ask here
HU Achievable Dream is Online
and available now to stream on Vimeo!
ALL 15 chapters of the HU Achievable Dream Guide are available to download on Vimeo!

Binge watch over 18 hours of inspiring, informative and entertaining stories and tips from 150 travellers!
"a cross between entertaining stories, tech tips, and reference guide"
"A timeless introduction to Motorcycle Adventure Travel!"
Originally launched as a 7 DVD set, The Achievable Dream series can now be downloaded anywhere. OVER 18 hours of solid info take up zero space in your panniers. How convenient!
Books

All the best travel books and videos listed and often reviewed on HU's famous Books page. Check it out and get great travel books from all over the world.
NOTE: As an Amazon Affiliate we earn from qualifying purchases - thanks for your help supporting HU when you start from an HU Amazon link!