 |
|

23 Oct 2006
|
|
Registered Users
New on the HUBB
|
|
Join Date: Oct 2006
Posts: 1
|
|
|
Advice about KLE500 fairings
Hi,
I have recently bought a KLE500 A2 as a winter project, it has had front end damage so i need to replace side and upper fairings, buy a new set of clocks, etc. This seems to be the best place to get advice about KLE's so i was wondering if somebody could help.
Firstly, how compatible are parts from different year models? I recall reading on here somebody said they saw "In the first photo you can see the right hand side panel is off of a B1 model." would this fit on normally or require modification at all?
Secondly, the few parts I have managed to find seem to always be just the right hand side fairing, is there any reason for this or just bad luck?
Thanks for any help you can offer
|

25 Oct 2006
|
 |
Registered Users
Veteran HUBBer
|
|
Join Date: Jun 2006
Location: Planet Earth
Posts: 105
|
|
Hi,
You have 3 options:
1. Buy from a dealer
2. Buy second-hand parts over internet or other alternatives
3. Reconstruct it with fiber-glass
I have had an road accident and all front side was messed up and I choosed 3rd option and I reconstruct all front and side -  after one full day of puzzle with other friends we managed to put them toghether and now looks like new.
As I know there are no major differences between versions of KLE. I have an KLE400A but is identic with KLE500A-A1 .... and now I want to change all plastics with those from 2005 model ... and it seems to get fit!

But you better look at original part and at new part to be sure it has same places for mounting. If you can't find a kawasaki dealer look at other kle's at biker's party, exhibitions etc
__________________
See me,
Feel me,
Touch me,
BEER ME!
Last edited by Kumuya; 25 Oct 2006 at 06:55.
|

6 Nov 2006
|
|
Registered Users
New on the HUBB
|
|
Join Date: Nov 2006
Location: Liverpool, UK
Posts: 13
|
|
I too have just bought a KLE500 as a winter project. Mine requires all panels plus headlamp fairing. I have managed to find a couple of right hand side panels but no left hand side ones. New panels are ~£200 each from Kawasaki, so they are out of the question [they would cost more than the bike did!].
The bike is 10 years old, so I am not after spending a fortune on it, but obviously want it to look ok. If anyone has a few spare panels lying around, or they know where there are some, please let me know!
This is my only bike and it's currently off the road 
|

7 Nov 2006
|
 |
Registered Users
Veteran HUBBer
|
|
Join Date: Jun 2006
Location: Planet Earth
Posts: 105
|
|
|
Did you try to find somebody that makes replicas? Here you can find people that makes you all fairings if they have an original and are at a good price too
__________________
See me,
Feel me,
Touch me,
BEER ME!
|

9 Nov 2006
|
|
Registered Users
New on the HUBB
|
|
Join Date: Nov 2006
Location: Liverpool, UK
Posts: 13
|
|
|
Not yet Kumuya, I might make the side panels myself [I have tracked some down in a couple of breakers, but they are asking ~£50 each for them]. I have managed to get the side fairing panels now and I think I might be close to tracking down a headlamp and front fairing, so all being well I could have it ready for getting back on the road this time next week...even though it will have all different coloured panels until I get around to respraying it!
|

29 Nov 2006
|
|
Registered Users
New on the HUBB
|
|
Join Date: Nov 2006
Location: Liverpool, UK
Posts: 13
|
|
|
Update on my '95 KLE500 project...
I have managed to get all of the panels now [except the right hand side panel that covers the main fuse]. The most expensive panel was the left hand side front fairing, £35, as noted ealier the left hand fairing panels are a lot harder to come by for some reason. The RHS one set me back about a tenner on ebay, oh and the biggest bargain was the LHS side panel, £6, from a guy in Austria...though with the postage it worked out at three times this! The one that made we weep was the headlamp...it came to just over a hundred quid for the lamp and cowl, although they were in very good condition and at least half the price quoted by Kawasaki for new ones. So bodywork done [minus a lick of paint].
Next was getting it running. I bought the bike from a guy who intended doing it up after it had been stolen/stripped/recovered. He had made a start putting some new bits on then got bored and sold it to me. One of bits that he had put on was a replacement ignition switch...and this was the main reason that it wouldn't start. There is a resistor in the original switch that needs to be transferred over to the new one. If not the plugs won't spark. Took me a few hours to find that one! It is quite a clever way of stopping someone smashing the lock off and shorting the ignition wires to start the bike.
Next was a new set of iridium plugs and an air filter clean, draining the tank and carbs and filling with fresh petrol [several people have told me that petrol goes off if left standing for a few months] And getting it MOT'd [passed first time!].
So this last week has been spent riding it at every possible opportunity! I have to say that I am very impressed with the bike. I never expected it to be as powerful as it is...having read all the usual 'good beginners bike' comments. The acceleration is far greater than it ought to be...reaching 80mph without much trouble...with a decent arm pulling urgency. I took it to 95mph and figure that there is a little bit more left if you can stand the wind trying to blow you off the back! I am still exploring the handling, though I suspect the bikes competency is greater than mine around the corners...but what I really love is the torque, its ability to potter around in almost any gear and pull from low revs. I just love the sound of it at low revs! I can't vouch for what mods have been done to the exhaust [it looks fairly standard] though it sounds quite loud, certainly in comparison to newer bikes. It sounds like a big single chugging away until you get over 5k revs then it starts to sound like a GPz. Lovely.
My next phase, now that it is running well, is to get it looking nicer. First to go has been all the bits that are not necessary for the riding that I am likely to do on it...the pillion footrests, bellypan, parcel shelf, disc covers etc. Each to their own I know, but to my eyes the bike looks better everytime I take something off it! Losing the parcel shelf [and fitting the indicators to the rear fairing] has had the biggest impact, the bike looks altogether more 'serious' now, the bike looks shorter and not quite as high...a little bit more 'in scale'. The swing arm looks the business now that it isn't half hid behind footpegs. I am toying with making small side covers that leave the frame exposed. Guess I just love the naked look! Of course all these bits can soon be put back on if required.
Sorry to go on a bit, but I am quite excited by this bike!
|

29 Nov 2006
|
|
Registered Users
Veteran HUBBer
|
|
Join Date: Oct 2005
Location: the haque, the Netherlands
Posts: 127
|
|
|
oi, if your finished with the naked look, post a picture, might make a nice centerfold.
|

30 Nov 2006
|
|
Registered Users
HUBB regular
|
|
Join Date: Oct 2006
Location: Cape Town RSA
Posts: 87
|
|
|
KLE rebuild
Hello There.
I agree, it is a hell of a feeling to rebuild a bike on your own. I get 160 kph on my bike (400 KLE) if I lie flat on the tank. That is about 100mph. The bike handles very well, and you can actually get low enough to scrape the foot pegs if you have some brass ones! I only managed that by mistake a few times! Just don't try that on knobbly tires.
I have to agree about the petrol. The unleaded petrol is no good to leave in anything. There is no lubrication, and your parts will rust if you leave them with that. If you want to store your carbs, tank etc. rather leave them in some diesel. This will preserve them over a long period. The fuel will only leave gunk if it is mixed with 2 stroke. Not a problem for us
I actually went the other way with my bike, putting in a bigger screen, and a box on the back. I hate the wind blast, and do quite a bit of touring on gravel roads.
Good luck and send some pics.
__________________
Pleco
If its stupid, but it works, it aint stupid.
|

30 Nov 2006
|
|
Registered Users
HUBB regular
|
|
Join Date: Nov 2006
Posts: 26
|
|
|
Pleco, 160? wow! I've never pushed it past 140, mine is running @ 8k rpm then. What is it revving at, 9000?
Post some piccies of the higher screen,
I would like to see.
|

2 Dec 2006
|
|
Registered Users
HUBB regular
|
|
Join Date: Oct 2006
Location: Cape Town RSA
Posts: 87
|
|
|
KLE screen
Hello Nicki.
I was too busy watching the GPS, and the road. Did not check the revs, but probably about 9 to 10k. If you try and run to there in 6th, it struglles. You have to run in fifth up to 140, and then change over. I only did that once though. It feels like you overwork the motor, and I get quite nervous past 140 anyway.
Give me a shout, I will come and show you how I made the screen. It is still in development, but reasonably easy to make.
Regards
__________________
Pleco
If its stupid, but it works, it aint stupid.
|

4 Dec 2006
|
|
Registered Users
New on the HUBB
|
|
Join Date: Nov 2006
Location: Liverpool, UK
Posts: 13
|
|
The story so far...
This is how it arrived in my garage, looking a bit sorry for itself!
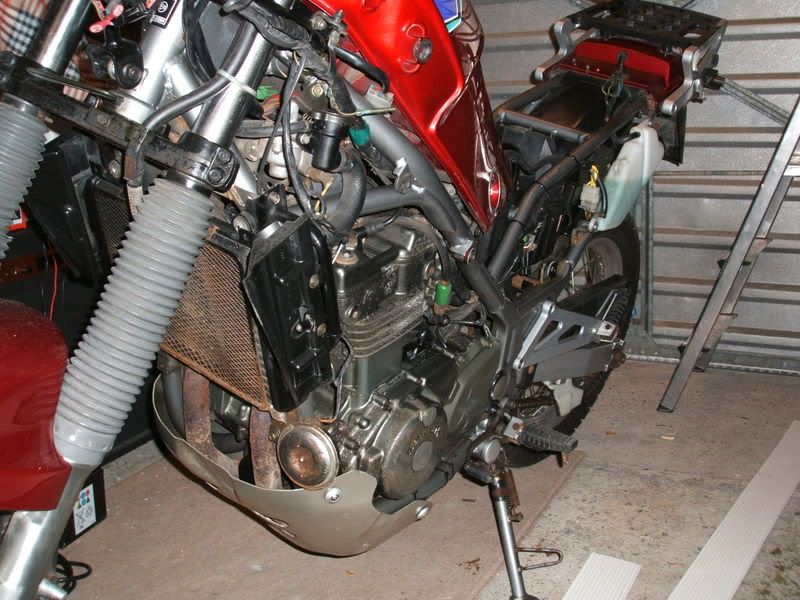
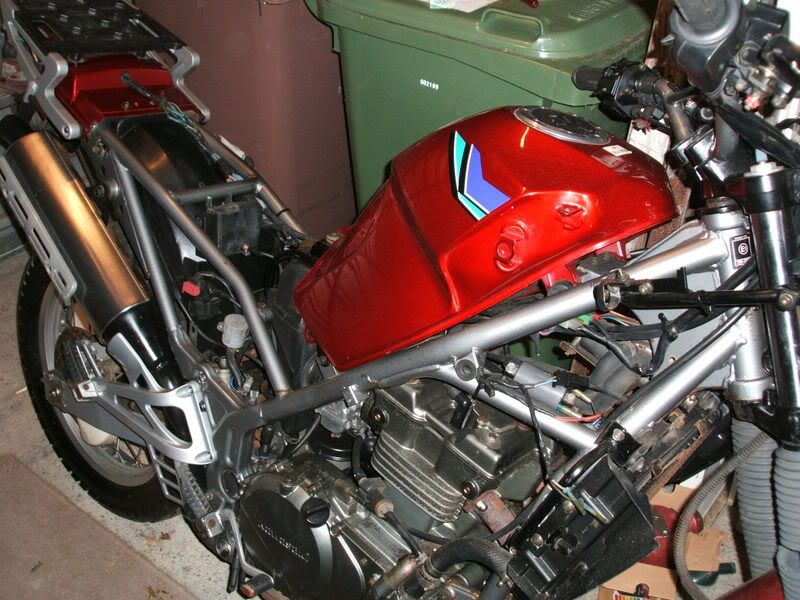
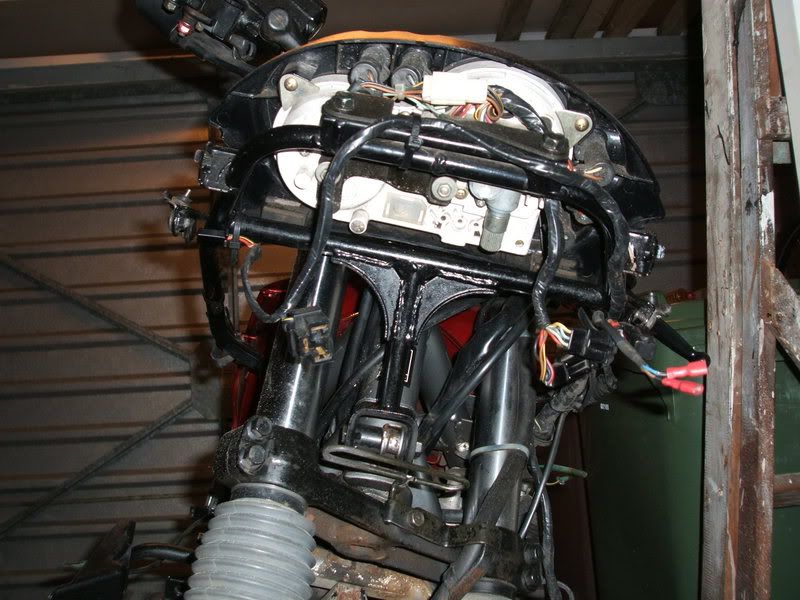
It had been bought as a project by someone who was just too busy to do it. The story goes that it had been stolen by kids who had ripped all of the panels off [presumably to make it harder to identify] with the intention of using it as a field bike...but that it had been recovered the same day. I figure that they had never got it running and dumped it [there is quite a simple but clever bit of electrics that prevent the plugs sparking unless the original ignition switch is fitted...ie it won't run hotwired]. I guess that it had become an insurance write off and had been sold as a spares or repair project.
Well the tools were out in no time. Initial assessment of the damage amounted to;
ignition switch smashed
no panels
no headlamp
not running
no mot
no battery
electrics [lights/horn/spark] not working
all minor stuff really. <<gulp>>
I needed a plan of attack. I decided that the priorities should be...
1/ get it running.
2/ get it mot'd.
3/ ride it.
4/ get it looking nice.
Getting it running
Within the first week, a new battery, spark plugs, air filter, fresh petrol and replacing half of the corroded bullet connectors on the wiring loom sorted out the non-running. It was firing to life willingly now. That first week was also spent half on the phone and half on ebay tracking down the bodywork bits. Some were easy to come by [for some reason there were loads of right hand fairing panels available but hardly any left hand ones]. Most of them were sourced from Austria for some unknown reason.
Whilst waiting for all the bits to arrive, it was a good opportunity to rub down and repaint some rust spots around the frame. The radiator grille was treated to a lick of paint, and the exhaust given a couple of coats of high temperature paint. Lets see if it does what it says on the tin [I will be surprised]. A new clutch cable and speedo cable were ordered and fitted. The front mudguard was repaired...the damn thing was rivetted on so had to be drilled off then bolted. As anyone who has worked on bikes will tell you, anything remotely inaccessible rusts. Bolts round off as soon as you try to apply any force to them. One of the hardest parts was stripping the brake light unit so that I could rewire it...the bolts needed drilling out, but they were bolted through plastic. When you are drilling, if you are not careful, the plastic will melt unless you keep cooling it off with water. It was a right pain that job. The chain was stuck rigid in a series of zig zags. A couple of days spraying with WD40 released it so that it could be relubricated. The engine was given a good clean and painted black on the left hand side where the coating had corroded. The right hand side was ok after a polish. The fork yolk was filed down and painted to repair the damage when it was stolen.
I preferred the look of it without the rear footrests and bellypan, plus I removed the plastic disc brake covers. Next to go is the shopping basket rack. It means redesigning the rear mudguard and mounting the indicators somewhere else...I will do that sometime soon.
By day 10 all the panels had arrived and were fitted [all in different colours!] , new indicators had been fitted and a headlamp wired up. The horn was repaired and most of the rest of the electrics rewired. It was ready for the mot.
It passed no problem. Thankfully being multicoloured is not an offence. One tax disc later and it was ready for a spin.
First time out...
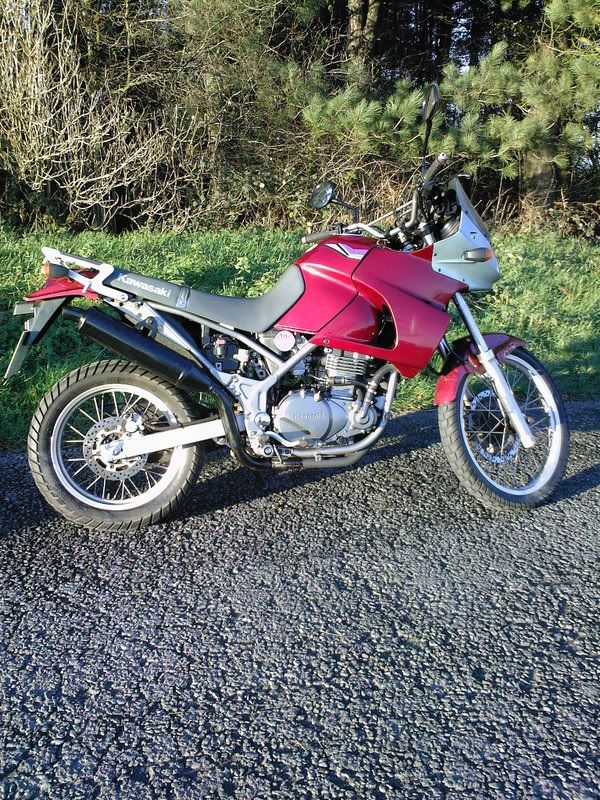
update...
the parcel shelf has now been removed and the indicators fixed to the rear fairing just underneath the seat. I think it looks a lot better but thats just my preference. [I will post a piccie soon.]
Things still to do...
I am waiting for a right hand side panel then I will get it sprayed all the same colour [red] without any decals
I am waiting for some clips to come so that I can fit the heat shield back to the exhaust...I think it looks a lot beefier with the shield on...but I think I might take that plastic mesh thing off it first. Note the lack of rear footrests...it makes the swingarm look stronger.
The windshield has now been removed...it wasn't doing much anyway!
|

5 Dec 2006
|
|
Registered Users
New on the HUBB
|
|
Join Date: Nov 2006
Location: Liverpool, UK
Posts: 13
|
|
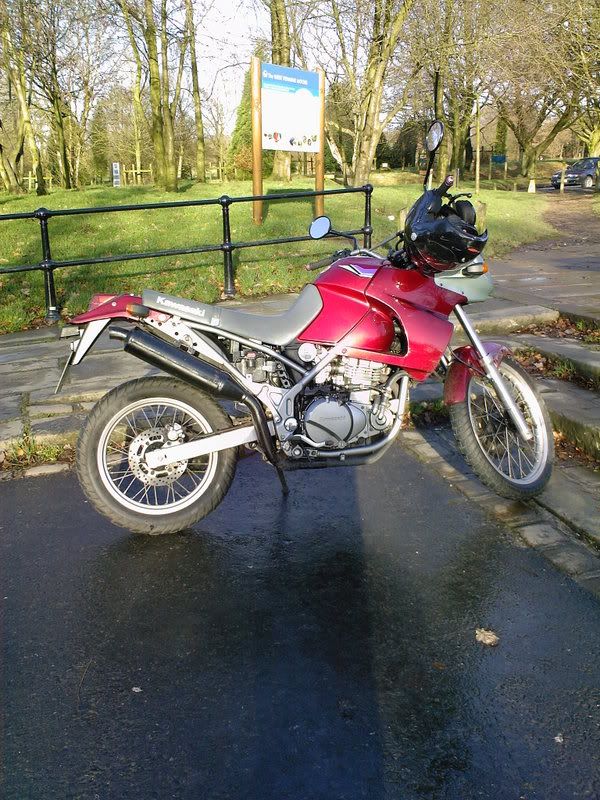
Here is a picture of the bike after the tail section was modified to remove the parcel shelf. Note the indicators remounted on the tail fairing.
[The photo was taken this morning in Rivington in the West pennines]
I have booked the bike in for a respray in January...colour to be either bright red or black with silver decals. I have not decided yet.
|

5 Dec 2006
|
|
Registered Users
Veteran HUBBer
|
|
Join Date: Oct 2005
Location: the haque, the Netherlands
Posts: 127
|
|
|
nice, espacially without the passenger footrest bars (or how ever you call those things)
|

7 Dec 2006
|
 |
Registered Users
Veteran HUBBer
|
|
Join Date: Jun 2006
Location: Planet Earth
Posts: 105
|
|
Nice work!!!! But no engine guard?  or you will use it only on road and you will transform it into a naked bike? because it started to look like one
that's why I love this bike you can play with it and make it more off road or more street
Good work! I wait more pics after is finished .... and I will put some after this winter when I will work on it (I still ride it so after the snow comes I start the big job) so on spring we can compare your naked with mine off-road 
How exactly is made that system for ignition?
__________________
See me,
Feel me,
Touch me,
BEER ME!
|

11 Dec 2006
|
|
Registered Users
New on the HUBB
|
|
Join Date: Nov 2006
Location: Liverpool, UK
Posts: 13
|
|
|
The original keyswitch has a 100 ohm resistor inside it...if you fit an aftermarket ignition switch you need to transfer the resistor over otherwise the plugs will not spark.
Hurray! at long last I have tracked down a right hand side panel [although because these things are quite rare it cost me more than any of the other panels; £50 <<gulp>>] I should have it shortly...then I will strip the bike down over christmas ready for its respray in January. The exhaust heat shield clips have arrived from Kawasaki and the shield has been replaced...it looks a lot better than the naked pipe.
I will be fitting a new front sprocket some time this week with one tooth less than standard [15 instead of 16]. I want a little bit more acceleration and am willing to sacrifice a little top end speed [I never go much over 80mph anyway because of the wind and vibration]. Has anyone altered their gearing? What effect did it have?? If I don't lose too much top end speed I might either reduce the front sprocket further to 14 teeth [although with a 2 tooth smaller cog the chain might start to rub against the swingarm] or increase the rear from 44 to 45/46 though I don't want to raise the revs too much when cruising at 70mph. When I came to take the front drive cog off yesterday I found it to be a bit loose on the drive shaft...you could rock it ~1mm side to side. I hope that the new cog is a tighter fit when it comes. Although it is not desperate yet, it is only going to get worse unless I can stop it rocking... if the splines on the shaft wear away it will be an expensive job to repair. Has anyone else had this problem? I can think of a couple of fixes that I might be able to do without removing and stripping the engine [welding a collar to the cog and bolting it throught the collar and shaft for example]...but if there is a simpler way of stopping it rocking I would be glad to hear it!!
|
|
Currently Active Users Viewing This Thread: 1 (0 Registered Users and/or Members and 1 guests)
|
|
|
 Posting Rules
|
You may not post new threads
You may not post replies
You may not post attachments
You may not edit your posts
HTML code is Off
|
|
|
| |
Check the RAW segments; Grant, your HU host is on every month!
Episodes below to listen to while you, err, pretend to do something or other...
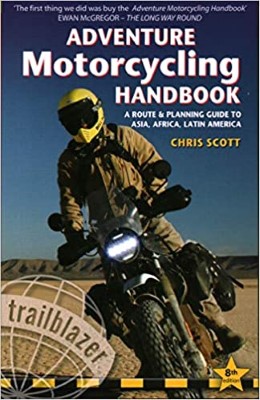
2020 Edition of Chris Scott's Adventure Motorcycling Handbook.
"Ultimate global guide for red-blooded bikers planning overseas exploration. Covers choice & preparation of best bike, shipping overseas, baggage design, riding techniques, travel health, visas, documentation, safety and useful addresses." Recommended. (Grant)

Led by special operations veterans, Stanford Medicine affiliated physicians, paramedics and other travel experts, Ripcord is perfect for adventure seekers, climbers, skiers, sports enthusiasts, hunters, international travelers, humanitarian efforts, expeditions and more.
Ripcord Rescue Travel Insurance™ combines into a single integrated program the best evacuation and rescue with the premier travel insurance coverages designed for adventurers and travel is covered on motorcycles of all sizes.
(ONLY US RESIDENTS and currently has a limit of 60 days.)
Ripcord Evacuation Insurance is available for ALL nationalities.
What others say about HU...
"This site is the BIBLE for international bike travelers." Greg, Australia
"Thank you! The web site, The travels, The insight, The inspiration, Everything, just thanks." Colin, UK
"My friend and I are planning a trip from Singapore to England... We found (the HU) site invaluable as an aid to planning and have based a lot of our purchases (bikes, riding gear, etc.) on what we have learned from this site." Phil, Australia
"I for one always had an adventurous spirit, but you and Susan lit the fire for my trip and I'll be forever grateful for what you two do to inspire others to just do it." Brent, USA
"Your website is a mecca of valuable information and the (video) series is informative, entertaining, and inspiring!" Jennifer, Canada
"Your worldwide organisation and events are the Go To places to for all serious touring and aspiring touring bikers." Trevor, South Africa
"This is the answer to all my questions." Haydn, Australia
"Keep going the excellent work you are doing for Horizons Unlimited - I love it!" Thomas, Germany
Lots more comments here!

Every book a diary
Every chapter a day
Every day a journey
Refreshingly honest and compelling tales: the hights and lows of a life on the road. Solo, unsupported, budget journeys of discovery.
Authentic, engaging and evocative travel memoirs, overland, around the world and through life.
All 8 books available from the author or as eBooks and audio books
Back Road Map Books and Backroad GPS Maps for all of Canada - a must have!
New to Horizons Unlimited?
New to motorcycle travelling? New to the HU site? Confused? Too many options? It's really very simple - just 4 easy steps!
Horizons Unlimited was founded in 1997 by Grant and Susan Johnson following their journey around the world on a BMW R80G/S.
 Read more about Grant & Susan's story
Membership - help keep us going!
Horizons Unlimited is not a big multi-national company, just two people who love motorcycle travel and have grown what started as a hobby in 1997 into a full time job (usually 8-10 hours per day and 7 days a week) and a labour of love. To keep it going and a roof over our heads, we run events all over the world with the help of volunteers; we sell inspirational and informative DVDs; we have a few selected advertisers; and we make a small amount from memberships.
You don't have to be a Member to come to an HU meeting, access the website, or ask questions on the HUBB. What you get for your membership contribution is our sincere gratitude, good karma and knowing that you're helping to keep the motorcycle travel dream alive. Contributing Members and Gold Members do get additional features on the HUBB. Here's a list of all the Member benefits on the HUBB.
|
|