Plenty of dudes have an unhealthy preoccupation with gear of one kind or another and I'm no different. Shiny new things provide fleeting distraction from bits of day-to-day suffering, and preparation for a long journey provides an excellent excuse to fill your garage with stuff.

Not long after I’d bought the DR650, I’d learned it inside and out, and spent a chunk of change bolting on this and that, in addition to tools, spare parts, camping gear, riding gear, surf gear, etc. Acquisition of all this stuff provides some concrete evidence to yourself that you’re actually going to huck into the abyss and ride off on your bike for who knows how long. The gear accumulation, tinkering, and over-preparation can become a hobby in itself, so much so that its possible to loose sight of the true objective: creating an independent means to experience new landscapes and peoples. You’re building an adventure sled, no more, no less; and any bit of tinkering that doesn’t directly contribute to the utility for that purpose is unnecessary. But it's still fun.
With so many unknowns ahead, it’s easy to dwell endlessly on which bit of kit is worth some of the precious space in your saddlebags. In reality, very few of these decisions matter much one way or the other. Nevertheless, at the height of my gear obsession before leaving home, one thing that helped me was reading what other folks had to say about their tried and tested gear. Now a year into my own journey I thought that I’d relay my experiences to date, but first, a tour of our adventure sled.
How to move into your motorbike with your girlfriend
Jamie and I regularly meet single travelers with more stuff than we have between the two of us. They are usually on big heavy bikes (e.g. BMW GS, Africa Twin) with massive metal boxes attached to the side and a huge duffel bag lashed to the back rack. This sort of setup has a number of disadvantages. The metal boxes sitting on a robust rack tend to add a fair bit of width, which inhibits movement through city traffic, or through narrow doorways. Some of these bikes we encounter weigh hundreds of pounds more than ours, making muscling them around in rocks, mud and sand much more difficult, not to mention hoisting them into a boat here and there. Rough offroad tracks can put a beating on the bike frame and I’ve met a number of travelers who have cracked their rear sub-frames. In addition, the energy used for packing, unpacking, and keeping track of extra stuff can outweigh the value of having it.
A lighter bike more sparsely loaded has all the advantages in these regards. Jamie and I have very little that we don’t use and I wouldn’t want to load the bike any heavier than it already is. In the images below you can see the bike all loaded up.
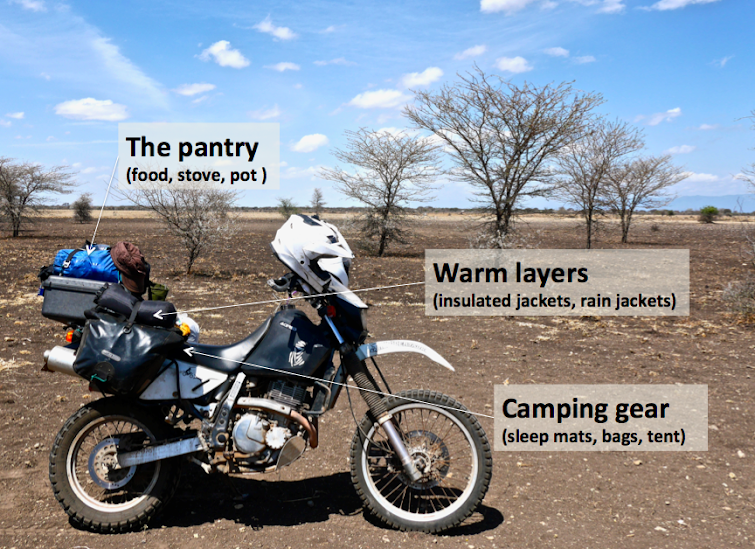
Our right saddlebag holds all of the camping gear and a 10 liter dry bag sits on top of the pannier which holds all of our warmer layers. We generally have about 2 days worth of food on board along with cooking essentials such as salt, olive oil, and chili sauce in the blue 15 liter dry bag.

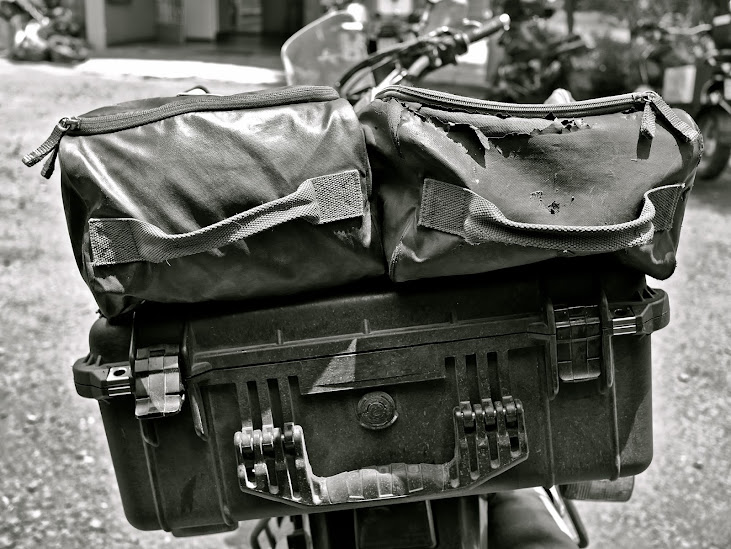
Our personal gear rides in the pelican case (model 1550) bolted to the back rack and a 20 liter Kriega dry bag on top of the case. All of the tools stay bolted to the bike an aluminum toolbox that rides just behind the left side cover. The left saddlebag is filled mostly with bike parts and maintenance stuff. We usually carry 2-3 liters of water, but can strap more on if needed. It’s a tight fit and we are pretty minimal, but we like it this way and I honestly can’t think of anything that I am truly suffering without. Now into the details for the gear nuts…
The Bike
Once deciding that a moto is the way to travel overland for you, the obvious question is of course, which bike? Countless book chapters and discussion forum threads abound on this very topic, which can be rather helpful if you start out knowing zero about motorbikes, like me. Was shacking up with a Suzuki DR650 the right decision? Put it this way, I may name my first-born daughter Dyna Rae in honor of my faithful girl. She’s getting a bit long in the tooth now at 45K miles, bears the scars of a hard journey, and she has something to groan about from time to time, but I think she looks good with a bit of African patina on her. The only troubles that she’s ever given me are things for which I could hardly lay the blame at her tires. A bit of carburetor drama from bad gas, some spark plugs carboned up from too-rich running, a missing bolt here and there rattled loose on rough tracks, and some desert dust getting into the ignition switch are all I’ve had to resolve on the road.
To my thinking, a relatively light 650-class bike is the perfect machine for this type of trip. It’s nimble enough that riding really rough stuff, tight single track, and loose sand is manageable, and you still have enough power on the highway. Even having had moments on the west coast of Africa where I would have loved a lighter bike, I wouldn’t trade the power of the 650, as it’s very often a huge asset getting around massive trucks and buses that clog lots of Africa’s highways. The DR is usually small and light enough for a few guys to lift into a boat, get through a narrow doorway, or to muscle up a set of stairs into a hotel lobby, and these types of situations occur with some regularity when traveling in Africa.
Modifications
A DR650 doesn’t come ready for overland adventuring straight out of the box. This can be a very good thing since it provides a novice mechanic like myself an opportunity to get to know the bike while doing all of the modifications.
Cockpit 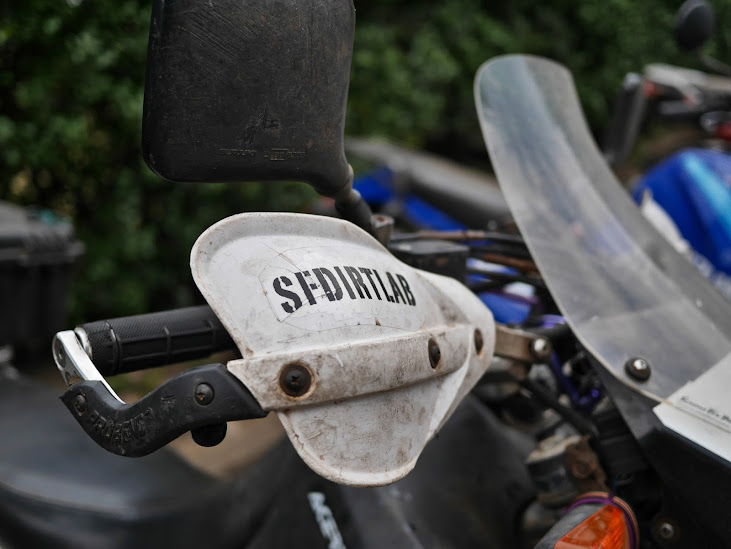
The
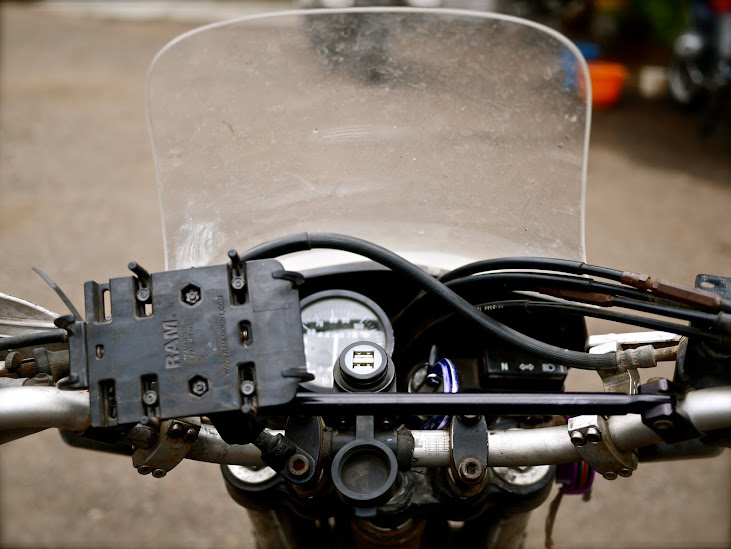
windscreen by Screens for Bikes in Australia is a pretty good compromise for maintaining a dirt friendly cockpit while still providing a good degree of wind protection. However, I do find a tendency to smack my helmet on the top of the screen when standing up in the dirt. Some spacers that push the screen to stand more vertical may be a good solution although my first attempt resulted in turbulent air hitting me in the head.
The
hand guards by Cycra are have survived plenty of impacts. The hardware that they come with corrodes easily and I ended up having a couple of bolts with the heads snapped off, but otherwise, they’re great.
I started out with a
USB plug wired to the spare lead behind the headlight, which lasted until South Africa before it fried itself. Good timing, really, since SA is the only place on this entire trip that I could get a replacement, and the navigation app on the Iphone eats the battery pretty quickly. The new one bought in Pretoria came with a fused harness that I wired straight to the battery and I find it’s nice to have power with the bike off. It also has two USB outlets and better weather protection than my previous one. I started with the
RAM Mount X-holder, but the rubber feet that hold the device eventually disintegrated and I replaced it with the
RAM Mount Personal Device holder – this one seems more robust and easier in and out.
The
seat foam and cover from Seat Concepts is excellent and also very good value compared to some of the other options. With the stock seat I never would have been able to do some of the long days in the saddle. I busted the cover stitching dragging my boot on the edge when mounting the bike and had it repaired in Togo, which has be solid ever since.
Carrying
The minimal
side racks from Ebay have worked perfectly as has the
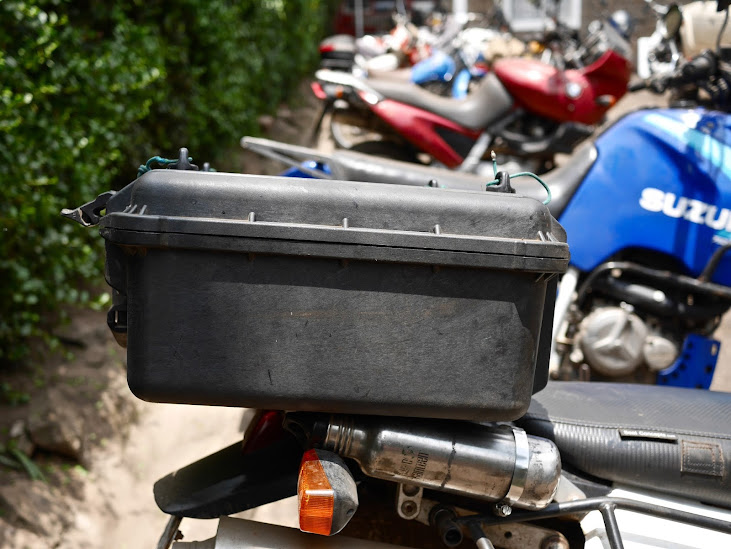
rear rack from Moto-Billet, which works great for bolting down a
Pelican Case. My first case was the
Pelican 1450, which had both latches broken by the time it was finished. When Jamie arrived, she brought us a
Pelican 1550, which holds double the volume of the 1450. The extra locking space is very nice to have. While Dyna looks a bit less like a sexy dirt bike with all that junk in her trunk, I think that for an overland trip, a bigger case is worthwhile.
I use a
Klean Canteen to carry stove fuel that wedges neatly between the Pelican case and the turn signal and secured with a hose clamp.
My
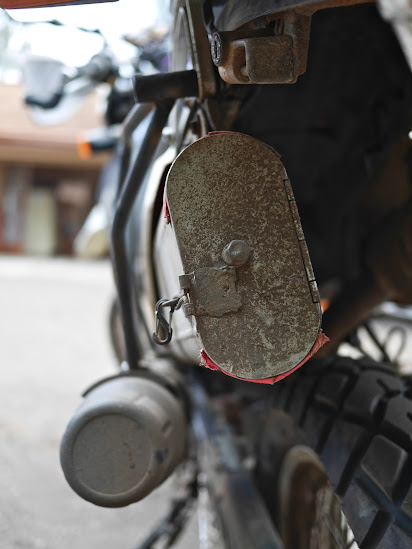
aluminum toolbox from MTE Engineering (via DRriders.com) has been a great solution, but not without a few problems. The lock broke somewhere in Sierra Leone, which was also the latching mechanism. I created a temporary solution with a welder in Freetown, but when that failed the bumpy, muddy road entering Ghana I lost my entire tool roll. After picking up tools one by one from street vendors to reassemble a tool kit I managed to loose all my tools for a second time in Togo. I ended up JB welding a new latch to the box and it has been solid ever since. Either the box or the frame mounts have bent inward and allowed it to smash up the chain guard, so in Nairobi I made up some 1-inch hard rubber spacers to push the box out, away from the bike. The
tool tube hose-clamped to the side rack works well enough, but the screw cap tends to jump threads when opening and closing it.

The
saddlebags from Ortlieb are tough as nails. I’ve abused the hell out of them on this trip and others and they are still kicking. On this trip, I repeatedly shoved one of them between my surf rack and the bike and had a few crashes that sent them flying about the bike. They are completely waterproof as long as you roll them shut properly. The Ortliebs have been around forever and are simpler and cheaper than most of the newer, ‘adventure’ marketed panniers more recently available. The plastic inserts keep the bags stiff and make them more user friendly day to day. The straps that go across the seat are very low profile, with no huge buckle or thick strap for you or your passenger to sit on. These bags don’t have lots of straps going all over the place, which seem totally unnecessary to me. A simple carabiner attached to the rear rack can be hooked to the haul loop of whichever bag is heavier to make sure that they ride evenly. A few things could improve the design (please take note Ortlieb) . Firstly, make them narrower – 7 inches wide rather than 8 helps keep everything closer to handlebar width, which is invaluable when navigating through traffic in busy city streets. Second, make bags square-shaped rather than tapered towards the bottom to make us some of the volume lost on the width. Finally and most importantly, the collar of the bags should be taller to allow a greater variable volume. This is a simpler solution than attaching a drybag to the top as we've done.
The best compact dry bags that I’ve found are the
Outdoor Research Durable Dry Bag. They have webbing loops sewn to the side that makes attaching them easy, they pack small when not in use. Jamie’s
Kriega 20 liter bag is great design that makes secure attachment to the bike a snap. Inside the saddlebags and pelican case we use these ‘
Mud Boxes’ made by Eagle Creek, which I’ve found very durable and convenient for organization.
Suspension
The stiffer straight-rate front springs in the fork along with a stiffer spring and Race Tech gold valve installed on the shock improved the off-road capability of DR650 considerably. Two-up, we could really do with a stiffer spring than the 7.5 kg/m one that we’re currently running on the shock.
Fuel and Engine
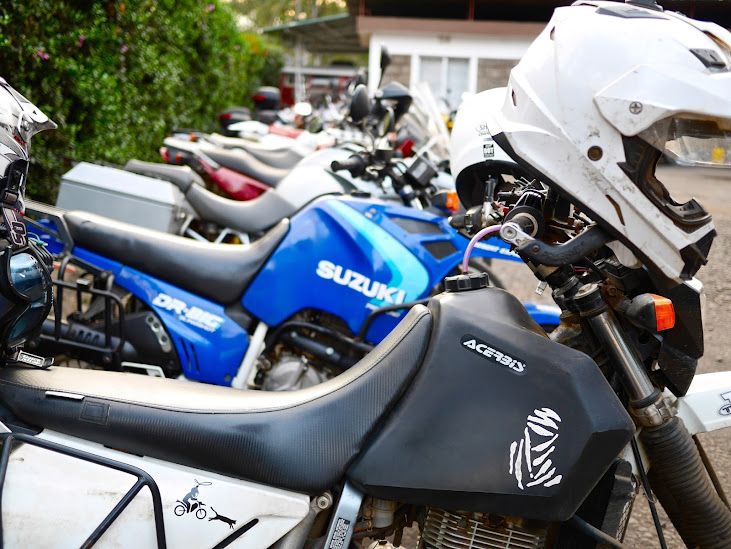
The
5.3 gallon tank from Acerbis has performed without issue and provides a safe range of about 240 (2 up) to 275 (alone) miles. If you can believe it, I've never once carried gas outside of this tank on the entire trip. That’s not to say that there were always petrol stations or that I could have planned better, but I have always been able to find someone in a village somewhere with some petrol that they were happy to part with. If the newer 6.6 Acerbis tank was available when I built the bike, I probably would have gone for that one instead.

The
bash guard and case armor from Procycle has offered peace of mind when dropping the bike whether on on a rocky uphill track in the Congo or the streets of Nairobi.
The
Hyabusa exaust along with the
mid pipe and mounting bracket from Keintech have held up beautifully.
Drivetrain

The last
525 DID x-ring chain lasted 20K miles without a problem and I’m hoping (counting on) similar mileage from the current one. The steel rear and front sprockets also lasted 20K miles and still had plenty of life left when I replaced them in Pretoria, though the 15 tooth front sprocket had been alternated with a 14 tooth one for at least 5K miles.
Tires
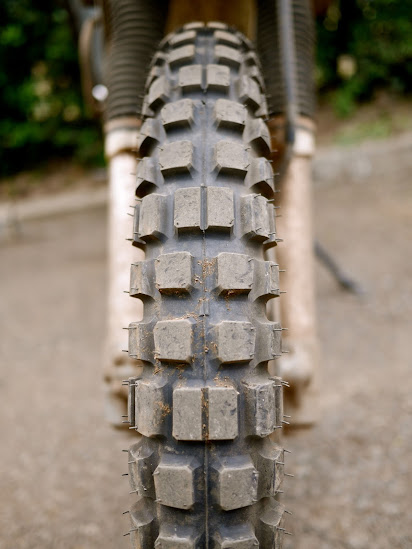
On this trip I’ve ridden the Michelin Anakee (rear), Mitas E07 (front and rear), Continental TKC 80 (front and rear), Haidenau K60 (rear), Kenda Big Block (front), and the Kenda 270 (rear). The best combo that I’ve found has been a high mileage 70/30 rear with a more knobby front to help stop from washing out on loose stuff. Carrying tires sucks and this combo can usually get you from one tire stop to the next.
The Anakee seemed fine – mostly ridden on tarmac, useless in the sand of the Sahara, changed it out in Dakar, which turned out to be a bit too soon.
The Mitas E07 rear wore quicker than I’d expected from previous reports after 5K miles away from Dakar. I never liked the way the front felt in the dirt. I had the opportunity to change for a pair of TKC’s that another rider had shipped to Accra and wasn’t going to collect, so I ditched the E07 with life still left.
The TKC’s were great in the mud of the Congo – they clear packed up knobs well with just a bit of speed and allow you to regain some traction. I was looking at the steel belting by the time I’d made 6K miles to Cape Town.
I rode the Haidenau rear (140 width) for 7K miles from Pretoria to Nairobi and it looked like it could go another 7K miles. It would have been great except for the fact that it had a delamination or something that caused a lump in the tire and vibrated something awful. From others’ reports it sounds like the 130 width (stock DR650 size) doesn’t get the same mileage as the 140 width tire, and I wouldn’t want to deal with wedging the 140 back onto the rim after a puncture repair, so I don’t think I’ll try it again.
In Nairobi I installed a Kenda Big Block front and Kenda 270 rear and this should make it all the way back to Europe. The Big Block front is about the same pattern as a TKC 80 and the rear Kenda doesn’t vibrate, so I love it.
Tools and Spares
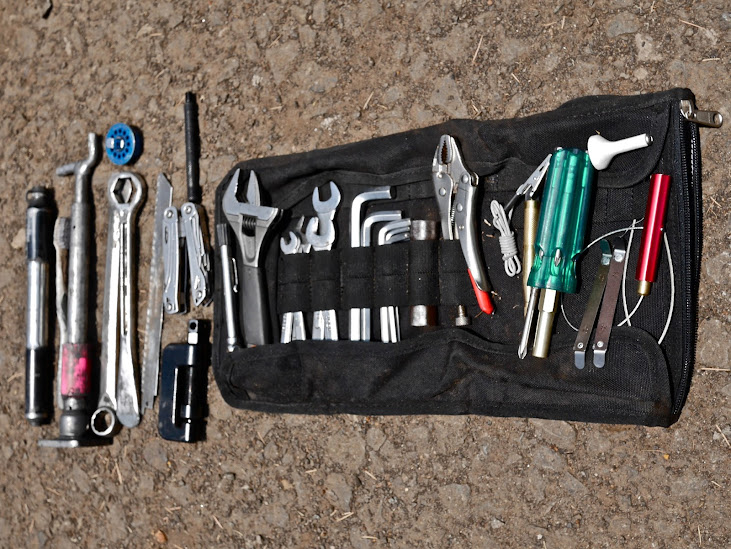
You can build a smaller and lighter tool kit, but it’s always a compromise for convenience. Having tools that you like using really makes maintenance and repairs much more fun. I’ve got wide mouth crescent wrench rather than the
7’’ Knipex pliers that I started with and everything else is about the same. I replaced the
Wolfman tool roll with the
Kriega tool roll which seems a bit nicer. I have yet to use the
Motion Pro chain tool, but good to have just in case.

Most of one saddlebag is taken up with spares and maintenance stuff. I’d say that all that I’ve brought along is worth having on a long trip if you don't want to end up having parts shipped from far away. In the blue case on the left are carburetor rebuild parts, spare brake pads, bulbs, fork seals, shock seal, front sprocket, wheel and headstock bearings, fuel filter, fuel line, gaskets, spare bolts, etc.. The stuff sack in the middle holds standard thickness tubes (heavy duty ones are installed), and the zip sack on the left holds spare straps, carabineers, tow strap, zip ties etc. I’ve hardly used any of the spares that I’ve brought, but I’ve been happy to have a few things when I needed them. The extra straps were very handy when my board rack broke in Cameroon and I used the tow strap on the fateful evening in Nigeria that landed me in the police compound.
Riding

The
Revit Turbine jacket was a great choice for Africa- it flows a decent amount of air and the Dynax mesh is very robust. Just don’t throw it in the dryer like I did or the glued bits are likely to start letting go.
The AFX dual sport helmet has performed admirably for a $100 helmet. It’s great value, but noticeably heavier and lesser quality finish than other options, all of which have price tag 2-3 times larger. I hardly ever use the
Smith Intake goggles and opt for cheap sunglasses bought here and there instead. The
Alpinestars Scout boots are good value and pretty waterproof, but they are plastic rather than metal where the buckles connect to the leather. One of mine broke and I had to JB weld it back together. The soles are stitched on so they are fairly easily resoled when the time comes. At about $100 more, I’d probably go for the
Gaerne Balance instead.
I started out with some
Joe Rocket Atomic Pants - they were only about $100 and had zip-off mesh panels, so they seemed to fit the bill, but in the end they were just too damn hot when stuffing around at borders and the like. Since Dakar I’ve just worn a pair of
Carhartt work pants, and when those wore through I bought some jeans in Cape Town.

My
Aerostitch Roper gloves are now the nastiest looking bit of kit I have. If the creature Gollum wore gloves, they would look like these. They are crusty, slimy, and the snap closures have ripped out, mostly due to weathering multiple rainstorms and my poor treatment of them. I still kind of like them though.
Bike Security

The bike is the least likely thing to get stolen on a trip like this. Europe and South Africa hold the highest risk of bike theft. In Africa you can usually park it somewhere secure or identify someone to look after it for you. Most places in Africa are exclusively the domain of 125cc bikes, and a big 650 is so foreign and conspicuous that very few folks would have a mind to try to make off with it. Owners and staff of guest houses are often sensitive to your concern for your bike and will have you bring it straight into a foray or a restaurant. Half the time I’ve been camping and sleeping right next to it anyway. A big security chain is definitely not worth the space and weight to carry. I have a
PacSafe cable lock that I’ve used one time to secure the saddlebags, and I always put a disk lock on if security feels uncertain.
Camping

The zipper of my original
REI Quarterdome 2 tent packed up in Sierra Leone and I suffered many a night for it. It was my own fault for trying to ride across Africa with a well-used $60 dollar tent bought on Ebay. The REI stuff is generally great value, especially when you can get it on sale. A tight fitting 2-person tent is definitely worth carrying rather than a 1-person coffin-sized tent. Jamie arrived with a
REI Quarterdome 3 tent that fits us and gear perfectly and only cost about $200.

I carry a
Trangia mini alcohol burner that fits inside its own pot/pan. It’s compact, simple, requires no maintenance, doesn’t turn your pot black, and I don’t have to get gasoline on my hands when I’m about to cook dinner. You can find denatured alcohol or ‘mineral spirits’ nearly anywhere and in a pinch you can even just burn rubbing alcohol from any pharmacy. The downside is it doesn’t burn as hot as a multi-fuel stove, so its not as good for really cooking and you don’t have a huge supply of fuel always on hand from your gas tank. We don’t cook every day, as many places it’s just cheaper and simpler to eat the street food, so I still like the alcohol burner above the multi-fuel option.
Zebra-light makes awesome bright headlamps and
Ka-bar makes great knives that hold an edge for a long time. While we often buy bottles of water, we also use the
Sawyer filter all the time to filter drinking water. A length of nylon cord has lots of uses from a clothesline to creating tie-downs on the bike.

My first
Exped air mat was plenty comfortable, but blew its baffles in Angola and my board bag became my bed. Jamie arrived with a replacement mat made by
Big Agnes and an Exped mat for herself. The Exped mat is a bit thinner and way quicker to inflate, but I’m not completely sold on the reliability of the flat valves that they use compared to the screw valves more commonly used by other manufacturers. Most of Africa is pretty warm unless you're in the mountains and there is no need for an insulated sleep mat. The air that fills these ones is plenty of warmth and they pack to less than half the size of those lined with synthetic or down insulation.
Jamie uses my Montbell Down Hugger #3 (30F bag), which I found too warm on most of the journey down the west coast of Africa. The down has lost some it’s loft that I attribute the constant humidity across west Africa. I now use the Montbell Thermal Sheet (50F) that Jamie brought with her. While I had a couple of cold nights in Botswana, I’ve been just fine since then, but I do tend to sleep warm. The Montbell down products are some of the best stuff available – light, compact, durable, and decent value. I’ve only ever owned two sleeping bags in 20 years, both are Montbell and both have seen many miles.
Surfing
Board

Bringing a surfboard on an extended overland trip is always a compromise between what you’d like to have in the water and what you are willing to drag around. Most surfers aren’t willing to tote a full quiver of 4-5 boards that would cover virtually any wave-riding situation imaginable. Instead, we pick 1 or 2 that will cover most conditions pretty well. I resolved to only bring a single board along for the ride. I needed something that would be fun to ride in big waves and small, flat faced and tubing waves alike, and also convenient to carry on the bike. Those criteria called for a board with more volume than a traditional high performance shortboard, but with that extra foam distributed over it’s with, rather than its length.
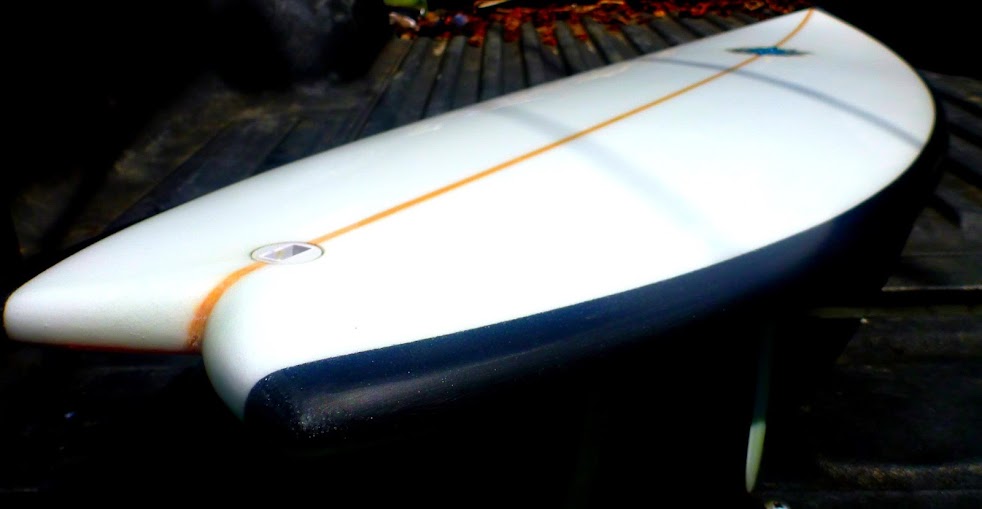
We’re spoiled for choices for surfboard creation in a place like Santa Cruz, with numerous legends of the craft quietly conducting their foam mowing alchemy in dusty shops all about town. One of these master craftsmen is
Ward Coffee, who has been shaping boards in Santa Cruz for more than 30 years. I skateboarded down to his shop to chat about a new board, and as always, he performed the translation of what I said that I needed into design specifications for my surfcraft. We came up with a 5’ll’’ quad fin, with a gentle entry rocker and the volume that I would ride in a board a step up in size from my standard shortboard. I brought along two sets of fins with different profiles and surface areas, which helped stretch the board’s versatility. The board turned out to be a blast to ride, a very good compromise for most conditions I encountered, it stayed in one piece, and gave me some rides that I’ll replay in my memory for a long time to come.
The shaper's job is to build a craft that helps you have fun sliding on waves, and the good ones, like Ward, sit down and listen to what you’re after, look at what you’re riding, and make it their mission to find your magic shape in a block of foam. I for one am very grateful to have them in our community. Check out
www.wardcoffeeshapes.com to see some of the diverse array of surfcraft that he puts into the water.
Surf Gear
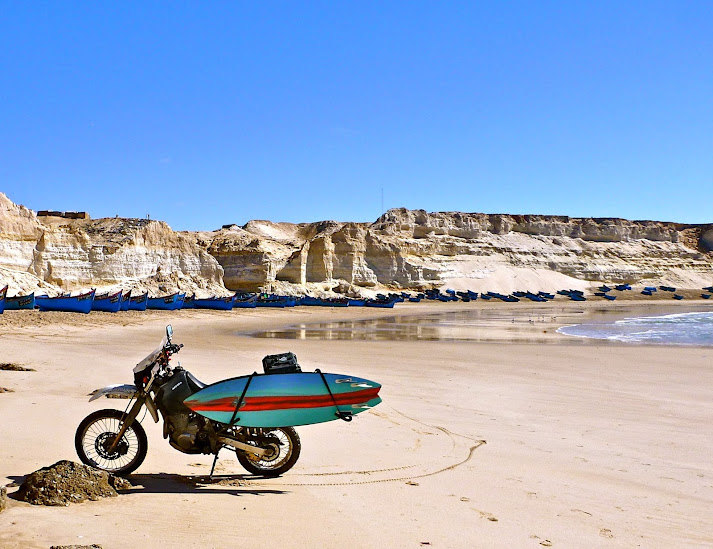
I carried an
Oneil Psycho 3/2 mm fullsuit which was just right for the trip, but I was cold in Namibia and around Cape Town. The rest of the time I just wore boardshorts and had a neoprene top for chilly mornings. The
Excel Drylock boots were the perfect choice of footwear since they have a tight gusset at the top of the boot that allows you to use them with a wetsuit or as reef boots with boardshorts without them filling up with water.

My surf rack was a modified from
Carver Racks in Hawaii. I used an extra mounting plate to splay the arms wider and hold the board closer to the ends. I really like the simple design of the rack and only having it mounted to the rear rack, which keeps it out of the way of my feet. The combination with soft saddlebags situates a bag between the board and the bike, cushioning the blow when the bike is dropped. It's is a good design, but the aluminum rack simply isn’t strong enough for a long overland journey – I broke it 4 times and I ended up fabricating replacement pieces from steel along the way. The steel is much heavier than the aluminum, but at least it can be welded nearly anywhere. Aluminum may work if thicker walled tubing was used and the welds to the mounting plate were reinforced, as I had done in Morocco.
Clothing
You don’t really need anything for a year that you don’t need for a week. 3 t-shirts, 3 socks, 3 underwear, 1 pair shorts, light insulating jacket, rain jacket, and rain pants will do it. Anything 100% polyester dries quicker but stinks like hell pretty quickly. I like 50/50 cotton polyester/cotton t-shirts, and Smartwool socks are the business. Come to think of it, a dog ate one pair of socks in Botswana, so it seems you really only need two pairs. Just pretend you’re a member of the Fellowship of the Ring scampering across the rocky hilltops of Gondor. I’m pretty sure Legolas didn’t pack many extra t-shirts.
Electronics
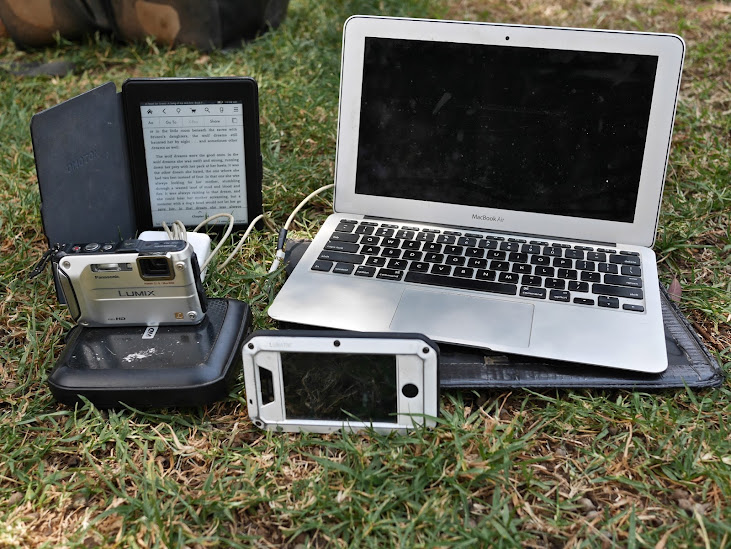
Every word written and photo processed is done with my
MacBook Air 11’’. Before I left on this trip I tried out a netbook that cost about 1/3 the price of the MacBook, but found it utterly frustrating to use mostly due to very slow processor and a small, poor quality keyboard. I’d never had a Mac before this and found the adjustment only mildly painful and the solid state drive with no moving parts should weather life on the bike alright. After two years of use I now find that the battery drains pretty quickly. The other downside of the tiny Air model is limited storage – only 128 gb, so video clips have to live on a 1 TB external drive.
The
Kindle is well worth the cost for the space saving convenience of being able to carry scores of books on the tiny device, though it is just another thing to charge up.
An
Iphone 4 in a weatherproof/shockproof case running the MapsWithMe app is the only navigation tool I’ve used on this trip and it works great.

My trusty
Panasonic TS-3 waterproof/shockproof camera has been a good camera to keep always in the pocket and use go-pro style. My higher quality camera – the Panasonic GF-3 w/14 mm lens died in Botswana, but the timing was good, since Jamie had brought along the newest model
Panasonic GX-7 with a 20mm lens. The GX-7 has the highest quality image sensor used in a micro 4/3 format camera and the manual controls have been helpful for working on basic photography skills. We currently have the 20mm and 14mm pancake lenses (28mm and 40mm full frame equivalents) and while a massive zoom lens would be nice, we’ve yet to give us the precious cargo space for one.
That's about all the gear talk I can fit in this space folks. I hope that you've found it helpful in some way, and please feel free to leave a comment or ask a question about any of the bits and bobs that inhabit our saddlebags.




 134Likes


 Linear Mode


