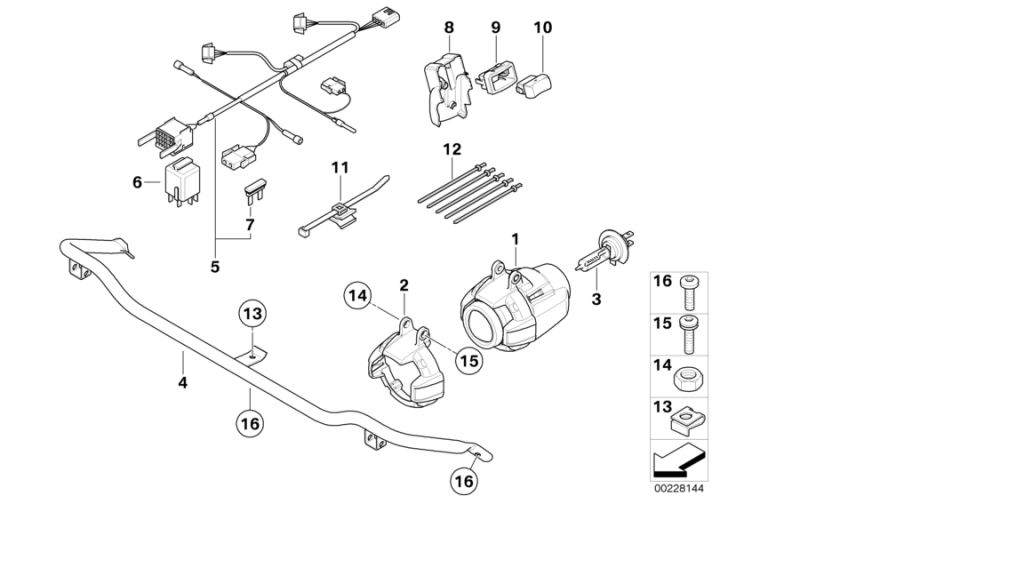
Ill Be Refering to this pic from the epc to make things a little bit more simple
Please note the wiring harness in this pic [5+7] will look nothing like the one you have its just a generic pic of a harness they use and also your switch [10] Will have quite a long wire coming from it

You can do the next points in any particular order, doesnt make alot of differance.
ok havnt fitted one of these in a while so might be slightly off.
First off you have to take off the fuel tank, an empty one makes this alot easier especially when refitting.
-Fit Spotlights to crash bars [1,2,3 should already come assembled unlike in picture]
Leave the bolts hand tight
-Assemble switch in housing and cover [10>9>8]
The switch will only fit one way into the housing [10>9] just push it in flat after feeding wire through
Fit the assmebled switch/housing into the cover, this will fit both ways cannot remeber which is the correct :confused1:
Take the rear cover off of your left hand multifunction switch (2 tiny t8 screws that are all to easy to lose) you will have to move/remove your hand guards if fitted
Fit the new swich/housing/cover in place of the one cover you just took off, a little bit fiddly against the clutch lever but it goes in eventually with a bit of wiggling. The switch wire needs to be fed through the little recess in the cover
Feed the switch wire down with the switchgear wiring thats already there, remove the cable ties 1 at a time and replace them with the switch in situe
You need to identify the control unit mounting, its rectangular plastic above your alternator, it will have a consideral amount of wiring going to the 2 control units that are housed inside. It has a few small electrical connections attached to the top 2 of these should be dead ends youll need both of these (1 later on) identify which one matches your switch wiring remove it from the balnking plug and then remove the blanking plug from on top of the housing, itll be a little tab you have to pull back before you pull it to the side (see your new switch connector for reference, they are easy to snap by incorrect removal) then push your new connector onto the space on the control unit housing and then connect the wire that you took off of the housing (the connector wont fit onto the tab on the control unit housing whilst the wires are connected together)
-To fit the relay you have to lift the control unit housing flap up to do this there is a tab either side of the housing that has to be released, softly pring with a screwdriver should release them, then lift the flap up with 1 control unit inside it. Youll then see the second control unit just lift this out of the housing and let it rest aside.
You then should see the relay housing there should be a space free, this is for your relay, it will only fit in one way
Refit the control units and housings in reverse order.
-To fit the wiring harness plug the plugs into the lights, i cant remember if one side is shorter or not, if it is as i cant remember which way they go and its down to you with trial and error im afraid.
Feed the wiring back through the bike, again i cant remember if it goes through the centre of the bike or to one side more trial and error
This is where that second dead end wire on the control unit comes in, connect this up with the plug thats half way down your new loom in the same way as your switch connector
Next the fuse box that you have already identified at the end of your loom this feeds down the left side of the bike (left side as you sit on the bike) when get to next to your air box youll see another tab like the ones on your control unit housing, this one shouldnt have anything on it so just push the mini fuse box on
Be carful with the throttle cable its easy to pull out of the housing when feeding the wire underneath this isnt a problem in itself just make sure it goes back in or youll get a little surprise when you come to turn your bike on

Cable tie all loose wiring as appropriate
If your wondering why they put it all the way back there its for ease of access
-Fit the tank back on but dont bolt it on or put the panels back just fit it loose, you may need to take it back off again to check things, just fit the fuel connectors and wiring.
Turn the bike on and hit your switch if all had gone well(and i havnt forgotten anything) your lights should come on.
now you need to set the level of your lights (not essential but best to)This is why you left the bolts loose. Put the bike a couple of metres away from a wall with the bike running and lights on and on the centre stand. I normally set them up so the beam throws stright so the distance between the aux light beam and head light beam are the same distance as the distance between the lights on the bike and also set them so both are at the same level, easily done by covering one at a time and checking where they shine
hopefully this helps
dont be afraid to pick my brains further if you need any more help