 2Likes 2Likes
-
 1
Post By sellheim
-
 1
Post By tlucas
 |

18 Oct 2012
|
 |
Registered Users
HUBB regular
|
|
Join Date: Jun 2007
Location: Colombia
Posts: 53
|
|
 How to do a 2012 KLR650 15000 mile Service
Sorry for the large thread …. Just a reply to some recent posts asking about spare parts and what maybe to expect along the way on a big trip.
Just finished the 15,000 mile or 24,000 km service on my 2012 KLR650. This post is for the benefit of those who want to have a crack at it themselves down the track, or want to know what they might be in for.
Am currently in Bucaramanga Colombia having ridden from Alaska on my way to Arge. Done about 80% good paved roads and 20% dirt and bad roads. Also have ridden through a lot of water throughout the tropics. Currently now on 3rd set of brakes, 3rd rear tire, 2nd front tire, 2nd chain, front and rear sprocket (although rear sprock was fine).
Done all maintenance pretty much to the manual so far, but probably missed a few other bits and bobs along the way. The service just done pretty much followed the manuals maintenance schedule with a few extra things myself the mechanic wanted to do.
The service took the mechanic (and his mostly useless Aussie assistant) about 21 hours to finish. Cost me US$140 for labour and US$160 in parts (a mechanic cost me US$130 for 2 hours labour in Canada, so I was quiet happy to hand over the cash). Rodrigo was the mechanic at Moto Y Motos in Bucaramanga. I highly recommend him if your ever down or up this way. I speak very limited Spanish but he understood everything, due to my pointing and hand action abilities.
The battery was down to about 30% capacity (oops), so it was topped up again to the correct level and charged it up over 2 days and it read 13.25V cold and 14.3V running. Spark plug was a little dirty but otherwise fine, so he just gave it a touch up with a fine file. Radiator reserve tank was pretty low so topped it up. Pulled off the carby, dismantled it, cleaned it and put it back together. It had a bit of gunk around the air intake but wasn’t too bad. Cleaned and re-oiled the air filter, was pretty filthy from the last cleaning 3000 miles ago. Dropped the engine oil and changed the filter, oil was still ok and no metal shards left on the magnetic drain plug.
Pulled off the rear tire and had 5 snapped spokes which was why it was wobbling so bad recently. Had them replaced and the wheel balanced (or spokes tightened correctly). Also had the wheel bearings and all the other related bits cleaned and greased, as it was down to about 30% grease. Dropped out the swing arm, the 2 bearings were almost bone dry, so cleaned and greased them. Same thing with the rear shock absorber linkage bearings (probably a combination of the weight, bad roads and water influx). Changed rear brake fluid, used a syringe with a rubber tube to suck and drain out old fluid from the rear master cylinder reservoir and caliper bleeders, then pump in new fluid. Best probably done with 2 people to pump the brake and get the excess air out. Rear brakes were down to about 10% so replaced them too. The allen key nuts were almost impossible to get off as the wobbly rear wheel must have distorted the nuts.
Spoke tightness and balance on front tire was all good, so left it alone. Front wheel bearing grease was down to about 30%, so cleaned and re-greased it. The guts of the speedometer drive unit were similar so did the same. He then dropped out the front forks and checked their compression, they were down to about 60% of their usual capacity. Drained out the old fluid and topped it up with some new fluid. The old fluid had apparently lost its viscosity. The front forks now felt a lot firmer. Then pulled off the front fairing and dropped out the main steering stem. It came apart quiet easy and didn’t need to bash out the bearings like in the manual. The 2 main steering stem bearings had about 60% lube left, he cleaned and re-greased them. Drained and refilled the brake fluid (had no way of knowing if the fluid was good or not, looked a little off colour, probably just loses its mojo after a while like the fork oil) the same method as the rear brakes and also replaced front brake pads which were down to about 10%.
Then started on checking the valve clearances. Had the valves checked last at 8320 miles and they were: exhaust 0.006in (0.15mm)both, intake 0.005in (0.12mm) both, now at 15,500 miles they were: exhaust 0.005in (0.14mm) front left, 0.006 in (0.15mm) front right, intake 0.005in (0.13mm) both. The mechanic wanted to get them better within the specs from the manual of: exhaust 0.006-0.010in (0.15-0.25mm), intake 0.004-0.008in (0.10-0.20mm). After getting some new shims that fit, he then got them ground down to what he wanted. After he installed them they measured: exhaust 0.0067in (~0.17mm) front left, 0.0063in (~0.16mm) front right, intake 0.0059in (~0.15mm). He pretty much just followed what’s in the Clymer manual.
Clutch cable was then disconnected at both ends and was almost bone dry. He used a syringe with a needle and gasoline and injected it down the cable and worked the cable back and forth through the casing, a lot of grimy filth came through. Cleaned it thoroughly with the gasoline, then with another syringe with no needle, slowly oozed fork oil down into the cable all the while working the cable to get it through. Did the same with the two throttle cables which weren’t as bad but still pretty dry. Apparently you’re supposed to do this every 5000 miles. I had just been hitting the cables from above with standard spray, which I guess didn’t really do much. He also took off the throttle grip and put some fork oil around the metal handle bar before putting the grip back on. This gave it a much faster return. Then did some slight re-adjustments with both levers and the adjustments. Checked the operation of the temperature gauge and fan which were all good. My temp gauge stopped working a while ago, turns out it just came loose from the cylinder head and needed to be pushed in properly. Had a test ride and it feels like a new bike.
If your to do any of this out in the field or away from your workshop, you may want to take with you: a larger ratchet, larger sockets and open ended ring spanners for the swing arm, rear shock absorber linkage, steering stem, forks, for tapping in wheel bearings, bleeding brake bleeder, a small say 30mm long hard aluminum tube (out of an old fork maybe) to slide over the top of your ratchet to give more leverage on the heavy bolts, a small thin flat bladed screwdriver for master links, circlips, clutch and accelerator cable tinkering, large flat blade for the timing and rotor bolt plug and popping out bearings, assortment of the deeper seated sockets for the front fork bolts, valve and cylinder bolts, feeler gauge and calipers for the valves, an assortment of shims, a small file for the spark plug, enough grease for all the bearings etc., degreaser for cleaning the bearings or gasoline(?), enough fork oil for the forks and cables(?), large syringe and tube for the brake fluid, smaller syringes and needle for the cable clean and lubrication, distilled water and a small funnel/medicine dropper for the battery, extra coolant, spare front and rear brakes?, spare spokes?, a decent allen key ratchet or on a handle for the front forks and brakes (the standard one wouldn’t crack the nuts), small thing of brake fluid, needle nose pliers for cables, circlip remover for wheel bearings.
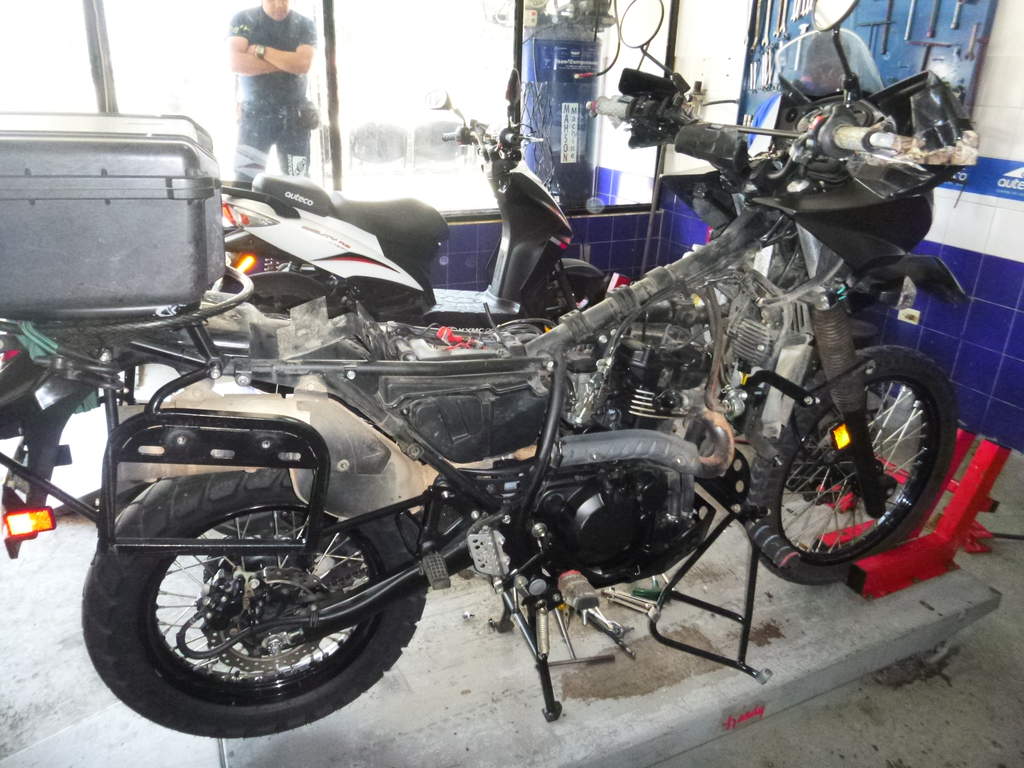
Get to work by stripping off the plastics/ seat and fuel tank
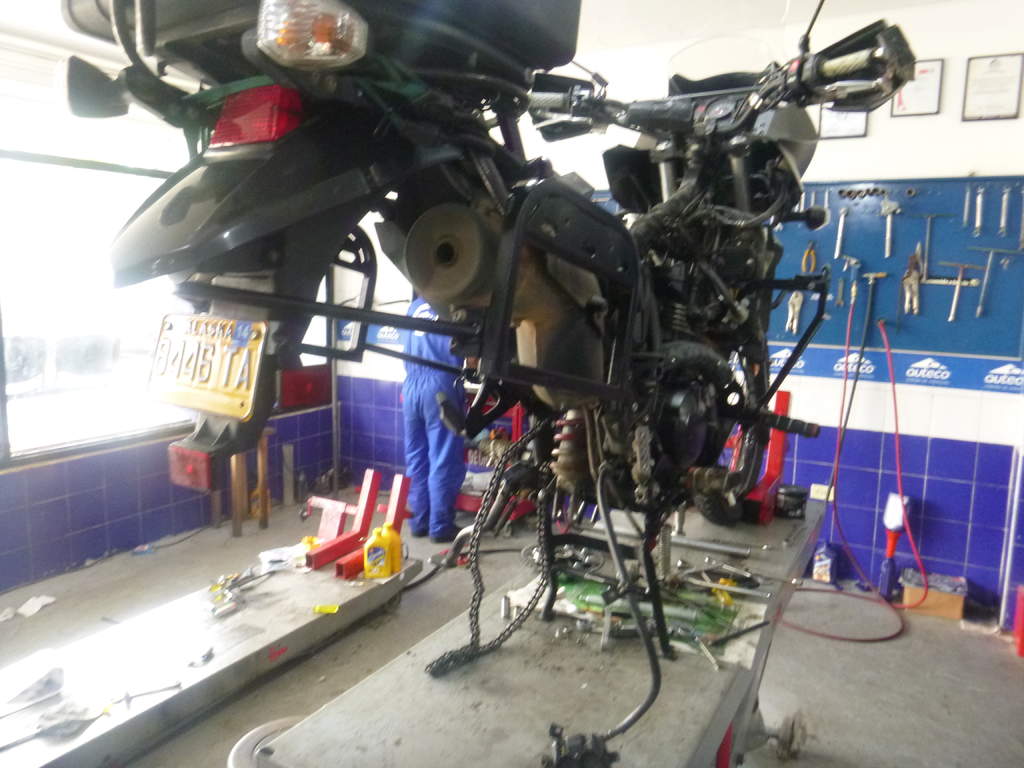
To service the swing arm bearings in the rear, you'll have to drop out the whole rear end
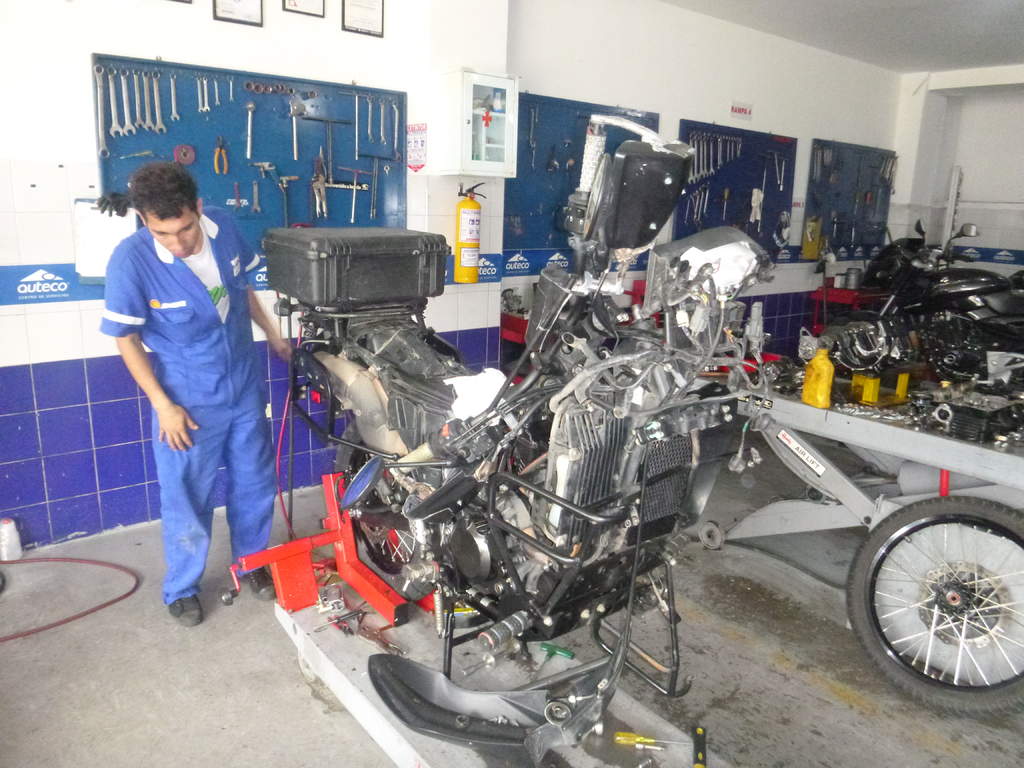
Rodrigo in action. To service the steering stem bearings, check the fork compression and or replace the fork oil - you'll have to drop out the whole front end, but can leave the handlebars still connected to the throttle cables. As you can see from the picture - it is handy also to have a center stand and to work on either the front or rear first - put it back together , then work on the other opposite end.
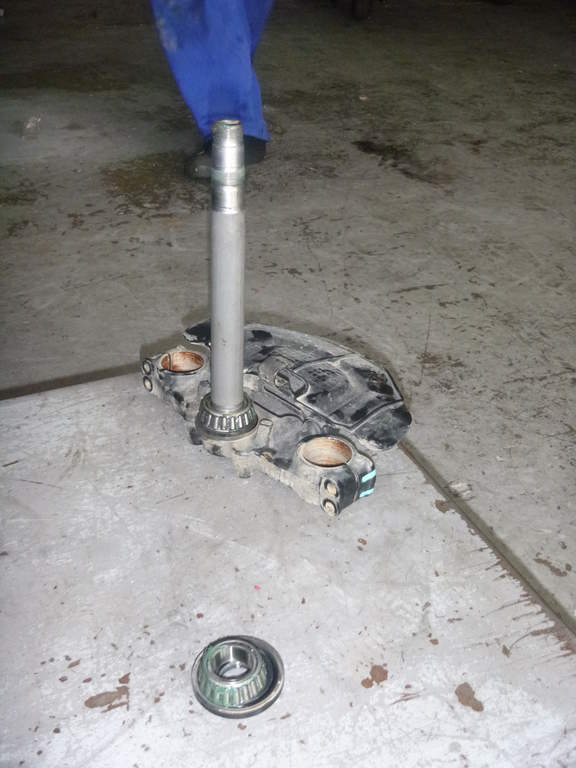
The steering stem out and getting bearings greased
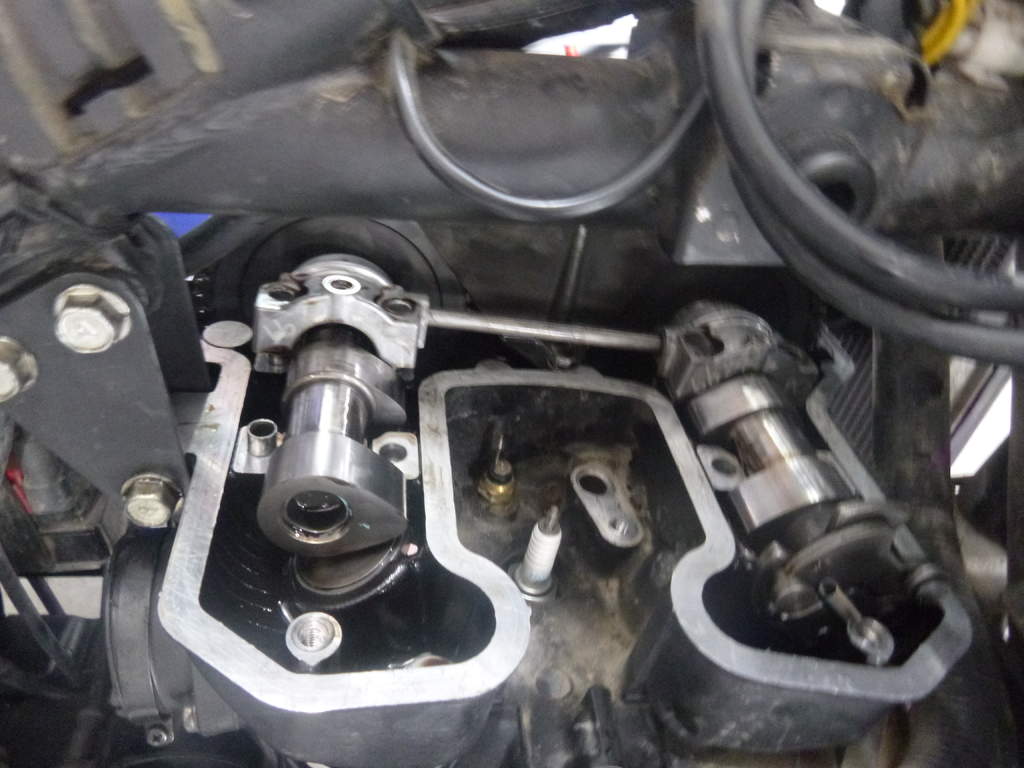
Checking valve heights - note the tiny distance between coin shaped shims and valves is what is being measured on a valve check , though you'll need a feeler gauge to check the distance , if they are out of specification - you'll need to get some larger sized shims ground down to the required height and measured with feeler gages to make sure its correct. I got the professional to do this.
Please post comments if there is anything else people should do, or a better method from what I have said
cheers
Dom
Last edited by sellheim; 26 Aug 2013 at 19:35.
|

14 Nov 2012
|
|
Registered Users
New on the HUBB
|
|
Join Date: Apr 2012
Location: Edmonton, Alberta, Canada
Posts: 4
|
|
|
This is great, thanks! I will be around the 24'000 km mark in Colombia as well, and will follow up on your recommendation (in a couple months, when I get there). Am in Mexico now at 18'000 km.
|

21 Nov 2012
|
 |
Gold Member
Veteran HUBBer
|
|
Join Date: May 2012
Location: Sokuluk Kyrgyzstan
Posts: 100
|
|
|
Valve shims
From what I understand, he just ground the valve shims to the thickness needed? Was this because you could not get the right shims or was it just easier and cheaper?
thanks,
Mac
__________________
Every day with the Lord is an ADVENTURE
|

22 Nov 2012
|
 |
Registered Users
HUBB regular
|
|
Join Date: Jun 2007
Location: Colombia
Posts: 53
|
|
|
hey, yeah they didnt have the exact thickness, so they just got the same coin that matched the old one and got it ground down to the correct , or near correct size. I guess the didnt have that exact size in stock, so they just made it work
|

23 Nov 2012
|
|
Registered Users
Veteran HUBBer
|
|
Join Date: Dec 2008
Location: South Africa
Posts: 117
|
|
Wow, what an incredible journey! I would love to do what you are doing one day. Here in South Africa it is Adventure Riding paradise. BTW, how is the KLR's oil consumption?
Have a safe trip. 
|

23 Nov 2012
|
 |
Registered Users
HUBB regular
|
|
Join Date: Jun 2007
Location: Colombia
Posts: 53
|
|
|
Hey yeah its all downhill from the states,
only uses oil when at higher speeds, say over 65mph, and not really too much, yeah looks like some great rides around SAF i was cruising there in a car in the wine region and that was pretty scenic, must be fun on a bike
|
|
Currently Active Users Viewing This Thread: 1 (0 Registered Users and/or Members and 1 guests)
|
|
|
 Posting Rules
|
You may not post new threads
You may not post replies
You may not post attachments
You may not edit your posts
HTML code is Off
|
|
|
|

Check the RAW segments; Grant, your HU host is on every month!
Episodes below to listen to while you, err, pretend to do something or other...
2020 Edition of Chris Scott's Adventure Motorcycling Handbook.
"Ultimate global guide for red-blooded bikers planning overseas exploration. Covers choice & preparation of best bike, shipping overseas, baggage design, riding techniques, travel health, visas, documentation, safety and useful addresses." Recommended. (Grant)

Led by special operations veterans, Stanford Medicine affiliated physicians, paramedics and other travel experts, Ripcord is perfect for adventure seekers, climbers, skiers, sports enthusiasts, hunters, international travelers, humanitarian efforts, expeditions and more.
Ripcord Rescue Travel Insurance™ combines into a single integrated program the best evacuation and rescue with the premier travel insurance coverages designed for adventurers and travel is covered on motorcycles of all sizes.
(ONLY US RESIDENTS and currently has a limit of 60 days.)
Ripcord Evacuation Insurance is available for ALL nationalities.
What others say about HU...
"This site is the BIBLE for international bike travelers." Greg, Australia
"Thank you! The web site, The travels, The insight, The inspiration, Everything, just thanks." Colin, UK
"My friend and I are planning a trip from Singapore to England... We found (the HU) site invaluable as an aid to planning and have based a lot of our purchases (bikes, riding gear, etc.) on what we have learned from this site." Phil, Australia
"I for one always had an adventurous spirit, but you and Susan lit the fire for my trip and I'll be forever grateful for what you two do to inspire others to just do it." Brent, USA
"Your website is a mecca of valuable information and the (video) series is informative, entertaining, and inspiring!" Jennifer, Canada
"Your worldwide organisation and events are the Go To places to for all serious touring and aspiring touring bikers." Trevor, South Africa
"This is the answer to all my questions." Haydn, Australia
"Keep going the excellent work you are doing for Horizons Unlimited - I love it!" Thomas, Germany
Lots more comments here!

Every book a diary
Every chapter a day
Every day a journey
Refreshingly honest and compelling tales: the hights and lows of a life on the road. Solo, unsupported, budget journeys of discovery.
Authentic, engaging and evocative travel memoirs, overland, around the world and through life.
All 8 books available from the author or as eBooks and audio books
Back Road Map Books and Backroad GPS Maps for all of Canada - a must have!
New to Horizons Unlimited?
New to motorcycle travelling? New to the HU site? Confused? Too many options? It's really very simple - just 4 easy steps!
Horizons Unlimited was founded in 1997 by Grant and Susan Johnson following their journey around the world on a BMW R80G/S.
 Read more about Grant & Susan's story
Membership - help keep us going!
Horizons Unlimited is not a big multi-national company, just two people who love motorcycle travel and have grown what started as a hobby in 1997 into a full time job (usually 8-10 hours per day and 7 days a week) and a labour of love. To keep it going and a roof over our heads, we run events all over the world with the help of volunteers; we sell inspirational and informative DVDs; we have a few selected advertisers; and we make a small amount from memberships.
You don't have to be a Member to come to an HU meeting, access the website, or ask questions on the HUBB. What you get for your membership contribution is our sincere gratitude, good karma and knowing that you're helping to keep the motorcycle travel dream alive. Contributing Members and Gold Members do get additional features on the HUBB. Here's a list of all the Member benefits on the HUBB.
|
|
|